Menu Options & Side Panel
Main menu
When editing project constructions a main menu is available. When editing system or library constructions only a context menu is available. Some of the menu options are also available on the side panel, the toolbar or the context (right-click) menu.
File menu
Save: Saves the project constructions and materials.
Properties…: Displays the project pathname and statistics on the project constructions and materials.
Close Window: Exits the Constructions Database. You will be prompted to save your edits.
Edit menu
Find construction…: Displays a dialog where you can search for project, system or library constructions containing particular text strings in either their IDs or descriptions. Constructions containing the search strings are then listed and may be selected for editing.
Add new construction: Creates a new construction in the current category (or the most sensible category for a multi-category tab). Not available from the tabs displaying more than one category such as Hard landscape or Misc. The exception, for convenience, is the Glazed tab, where it is enabled but will always create a construction in the External Window category (this category can be changed after creation).
Duplicate construction: Creates a copy of the currently selected construction.
Delete construction(s): Removes the selected constructions from the project unless they are assigned to elements in the model.
Edit construction…: Displays a dialog to edit the construction.
Preferences…: Displays a dialog where you can set grid colours.
Copy construction to project: Copies the construction to the project. This is only enabled when editing system or library constructions.
View menu
Toolbar: Toggles the displays of the toolbar.
Side panel: Toggles the displays of the side panel.
Status bar: Toggles the displays of the status bar.
Refresh: Refreshes the display of the grid.
System materials…: Displays the materials in the system database and allows them to be copied to the clipboard for pasting into a project construction. See System materials below.
System constructions…: Displays the constructions in the system database and allows these constructions and their materials to be copied to the clipboard for pasting into a project construction. See System constructions below.
Project materials…: Displays the materials used in the project constructions and allows them to be copied to the clipboard for pasting into another project construction. See Project materials below.
Review manager…: Provides facilities for viewing, printing or copying a textual description of selected project constructions.
Construction usage…: Displays a list of elements in the model that use the currently selected construction.
Library (constructions and materials): Displays a sub-menu giving you access to any of the library materials or constructions. For example there is an IMPACT library for use in the cost planning and life cycle software.
Settings menu
Wind exposure…: Allows you to set the wind exposure index used in ApacheCalc to calculate external surface resistances. Choose from the following options:
· Sheltered: sheltered from the wind
· Normal: typical wind exposure
· Severe: severe wind exposure (e.g. coastal)
The wind exposure index is used in ApacheCalc to calculate the external surface resistance of walls, windows, roofs etc. when a value is not explicitly entered in APcdb. This parameter may also be set in ApLocate. Note that ApacheSim has its own method for calculating external surface heat transfer.
Enable composite layers: Allows you to be able to create composite layers in a construction layer, where a single layer is composed of 2 or 3 separate materials in give proportions. Therefore this should be enabled if you need to create constructions with composite layers.
Composite layers are generated in certain ASHRAE wizard-generated constructions. However these do not normally require subsequent editing. See Composite layers for details.
Composite layers are also used in the cost planning and life cycle software where sub-layers using real materials can be used to increase the accuracy of material usage. This software imposes certain rules on allowed combinations of BRE materials in a composite layer; after any such edit any rule violations will be checked and if necessary a validation window will display showing the rule violations and inviting you to fix them or enter a justification for the edit. See BRE materials for details.
Calculations menu
Derived parameters…: Displays a set of derived parameters summarising the characteristics of the currently selected construction. See Derived parameters below.
Condensation prediction…: Accesses a facility for performing condensation analysis on the currently selected construction. See Condensation analysis below.
Actions menu
Purge unused project constructions: Removes all constructions that are not assigned to any elements in your model.
Delete selected constructions: Identical to Delete constructions in the Edit menu.
Tools menu
Manage Filters…: Displays the standard tabular edit feature which allows you to manage the filters controlling each tab.
Configure tabs and columns…: Displays the standard tabular edit feature which allows you to edit the columns that appear on this tab.
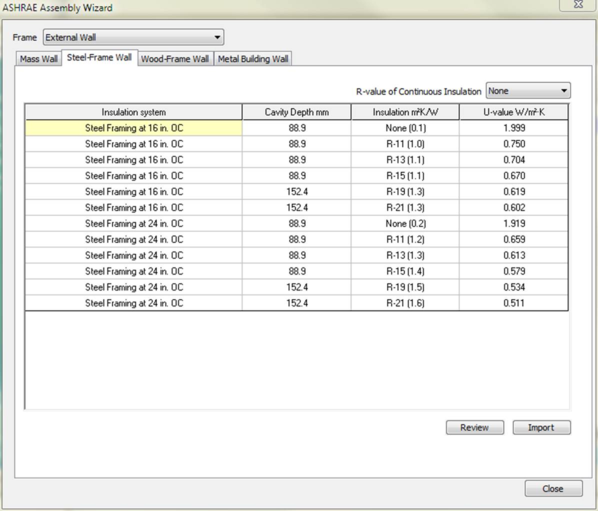
ASHRAE construction wizard…: Displays the ASHRAE Assembly Wizard dialog, where you can create constructions suitable for use in ASHRAE compliance. Some of these may generate constructions with composite layers (see Composite layers). See also ASHRAE 90.1 tables (A3.1a/b etc.).
Figure 2 ASHRAE Assembly Wizard
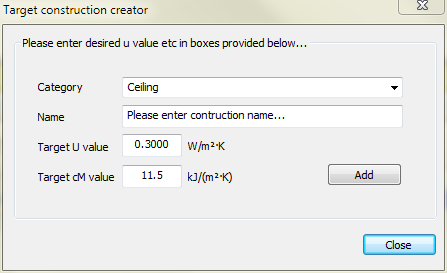
Create target construction…: Displays the Target construction creator dialog, where you can create a construction with a desired category, description, U-value and cM value. . The rules for calculating the cM value (the effective thermal capacity) of a wall floor, ceiling etc. can be found in the CEN standard: prEN 13790.
Figure 3 Target construction creator dialog
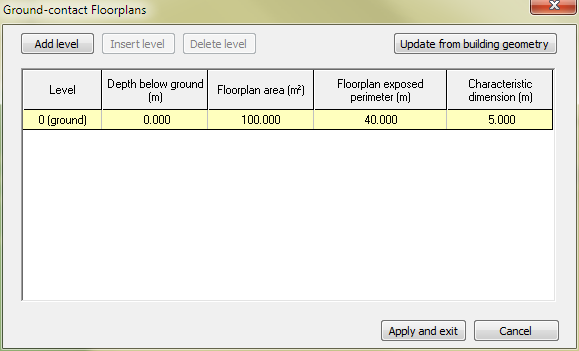
Ground contact floorplans…: Displays the Ground-contact Floorplans dialog. This allows you to manually specify properties of levels of the building which are in contact with the ground, for use (for example) in UK Part L2 where these details are essential for ensuring an adequate U-value for ground-contact walls and floors. The properties may also be assigned automatically from the building geometry. Details of this dialog and related utilities are described in Section 4.
Figure 4 Ground-contact Floorplans dialog
Help menu
User guide…: Displays this document.
Toolbar
A toolbar is available with several commands. When editing system or library constructions only a subset of the commands is available. All the commands are also available on the side panel, the main menu or the context (right-click) menu.
Figure 5 Toolbar

Save the database – same as File->Save on the main menu.

Open review manager to review or print constructions – same as View->Review manager… on the main menu.

Open a dialog to find constructions – same as Edit->Find construction… on the main menu.

Add a copy of the selected constructions – same as Edit->Duplicate construction on the main menu.

Add a new construction – same as Edit-> Add new construction on the main menu.

Edit selected construction – same as Edit->Edit construction… on the main menu.

Delete selected constructions – same as Edit->Delete construction(s) on the main menu.

View where this construction is used in the model – same as View->Construction usage… on the main menu.

View the system materials – same as View ->System materials… on the main menu.

View the system constructions – same as View ->System constructions… on the main menu.
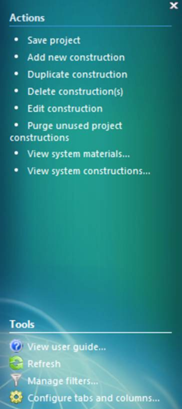
Side panel
A side panel is available with several commands. When editing system or library constructions only a subset of the commands is available. All the commands are also available on the toolbar, the main menu or the context (right-click) menu.
Save project – same as File->Save on the main menu.
Add new construction – same as Edit-> Add new construction on the main menu.
Duplicate construction – same as Edit->Duplicate construction on the main menu.
Delete construction(s) – same as Edit->Delete construction(s) on the main menu.
Edit construction – same as Edit->Edit construction… on the main menu.
Purge unused project constructions – same as Actions->Purge unused project constructions on the main menu.
View system materials… – same as View ->System materials… on the main menu.
View system constructions… – same as View ->System constructions… on the main menu.
View user guide... – same as Help->User guide… on the main menu.
Refresh – same as View->Refresh on the main menu.

Manage filters... – same as Tools->Manage Filters… on the main menu.
Configure tabs and columns... – same as Tools-> Configure tabs and columns… on the main menu.