Daikin VRV Systems (Sizing and Simulation) Application
On entering the Daikin VRV Systems tool

you are presented with the Daikin VRV Systems (Sizing and Simulation) screen.
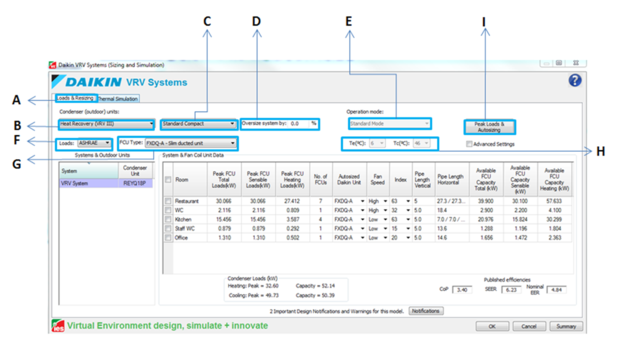
Loads & Autosizing
A) Loads and Sizing Tab – This screen enables load calculation for the model, by changing the options within this screen you can define the different types of VRV systems that will be automatically selected based on the calculated loads
B) Selects the VRV system type. VRV III & VRV IV systems are included.
i. 2 pipe - Heating or cooling system
ii. 3 pipe – Simultaneous heating and cooling system
C) Selects sub types of VRV systems
a. *2 pipe options VRV III (VRV IV has a single non-changeable sub category)
i. High COP system – highest efficiency 2 pipe system – larger outdoor footprint – 12 to 36 HP
ii. Mini VRV 3 phase – Very small footprint – 3 phase electrical supply – 4 to 6 HP
iii. Mini VRV single phase – Very small footprint – single phase electrical supply – 4 to 6 HP
iv. Standard Compact – Small footprint – 3 phase electrical supply – largest range – 8 to 54 HP
b. 3 pipe options (all three phase electrical supply)
i. High COP system – Highest efficiency 3 pipe system – larger outdoor footprint – 16 to 24 HP
ii. High Temperature Domestic Hot Water system – System capable of providing high temperature DHW as well as heating and cooling via fan coils – 8 to 16 HP
iii. Standard Compact – Small footprint – 3 phase electrical supply – largest range – 8 to 48 HP
* If selecting 2 pipe systems then you must select a Master control zone which can be found in the Apache Systems menu in the “control” tab.
D) Oversize system. This box allows a % increase which is added to all loads in order to allow a margin of safety. Negative figures are allowed in order to view the effects of undersized systems in Vista (NB Daikin advise against installing undersized systems due to increased wear and tear on important components)
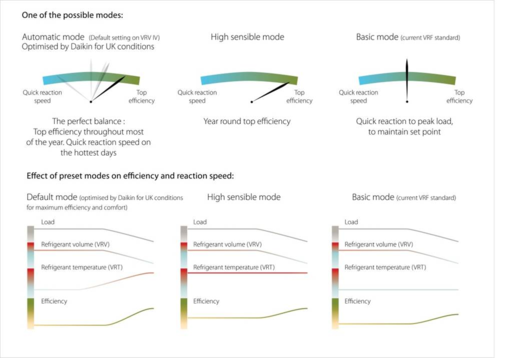
E) Operation mode (VRV IV only). There are 3 options available for VRV IV systems that change the way VRV systems operate. Each mode alters the way that the system refrigerant temperature changes to adapt to the capacity demand and application.
a. Standard Mode: Fixes the target evaporating and condensing temperatures throughout operation, giving quick response times to increases in load. Minimal plant size required.
b. Hi Sensible Mode: Allows you to fix the evaporating and condensing temperatures at different values, useful in alleviating draughts in sensitive areas and can substantially increase system efficiency. Requires increased plant sizes.
c. Automatic Mode: Combines the advantages of Standard and Hi Sensible modes whereby the system automatically changes the evaporating temperature to suit the application, increasing efficiency at lower loads and enabling quick responses when loads are high. Automatic mode offers higher efficiency and comfort than standard mode with the smaller plant selections than Hi sensible. Default option for most applications.
F) Loads. This option lets you select between CIBSE or ASHRAE loads calculations
G) Fan coil unit type. This button allows the selection of the fan coil unit type. A mix of fan coil types can be made once the loads have been calculated, but by entering the most commonly anticipated fan coil type beforehand you can save a considerable amount of time, especially on larger projects.
H) Target evaporating and condensing temperatures. When using Hi sensible mode with Variable Refrigerant Temperature the selection of the target Evaporating and Condensing temperatures can be set here.
I) Peak loads and Autosizing. This button performs the loads calculations for each zone and selects an appropriate fan coil(s) for each space and a suitable condenser based on the options previously selected.
On completion of the load calculations the condenser and fan coil selections are presented
The selected condenser displays the Daikin model reference, when multiple VRV systems have been created, click each condenser in turn to view the associated fan coil information in the System & Fan Coil Unit Data dialogue.
The System & Fan Coil Unit Data dialogue displays the relevant information for each room or zone. The “Total loads” tab includes the sensible plus latent loads followed by the sensible loads and heating loads.
The number of fan coils selected follows in the next column, if you require a larger number of fan coils then double clicking in this field will allow you to overtype the selection with the required number and the VRV module will re-select the required sized units.
Fan Speed denotes the selected fan speed of the indoor unit. Lower fan speeds give increased protection against draughts but offer lower capacity.
The Index column shows the size of the Daikin fan coil, the larger the index, the larger the capacity. If you would like the Daikin VRV Systems plugin to reselect fan coils of a lower index then please change the number of fan coils required as the plugin will not reselect when changing the index. Changing the index is usually used when checking the effect of over sizing fan coils.
Both the horizontal and vertical pipe lengths reflect the distance from the fan coil to the condenser. In order to get an accurate selection and simulation, the pipe lengths should be as accurate as possible. There are numerous pipework limitations that protect the system from high pressure drops which have been incorporated into this module and these are outlined later in this document (see Design Notifications) The following workflow should ensure adequate accuracy.
· Right click on the room where the pipework from the condenser will first split to an indoor unit and select “Start pipe span from this room”
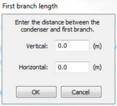
· A pop up will appear asking for the horizontal and vertical distance to the condenser, enter the relevant values taking into account that if the condenser is below the ceiling level for the selected room then a negative figure should be used
The module will then calculate estimated distances to all of the other fan coils, the fan coils are all assumed to be in the middle of the room or zone. These pipe lengths serve as an estimation for early stage design but should be corrected to the correct lengths for more accurate results, which is why the pipe lengths themselves are editable. Double click in any of the fields to change pipework lengths. The more accurate your pipework lengths, the more accurate your simulation will be.
An example of pipe length entry can be found at the end of this document.
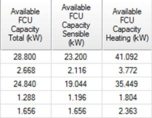
The following fields show the available capacities from the fan coils once all corrections have been made
Underneath the Daikin VRV selection information the required condenser loads and available capacity are displayed along with the published efficiencies. The published efficiencies can be used after a simulation for comparison purposes.
The Notifications button accesses warnings and general notifications about the design of the Daikin VRV system. Clicking this button opens up a document that outlines where the system design may be outside of the allowable design parameters.
Some of Daikin’s design parameters are dependent on pipe length, accurate pipe lengths enable the module to determine if any of these parameters have been exceeded.
As system diversity can now be accurately assessed you may find that systems are selected with a high level of diversity (the ability to attach more fan coil capacity than the total capacity available from the condenser)
We strongly recommend that any notifications or warnings on your selection are discussed with Daikin who can be contacted on
engineering@daikin.co.uk who will be happy to provide confirmation of limitations and help with selections.
Thermal Simulation
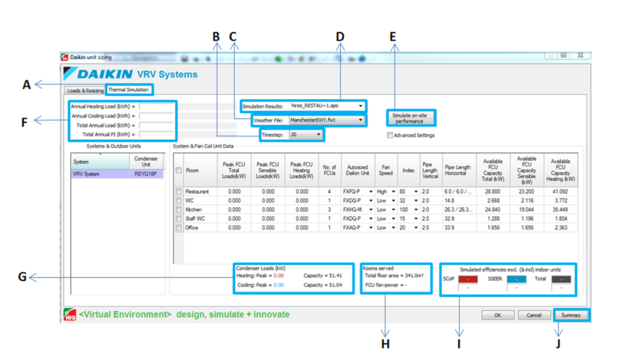
A) Thermal Simulation Tab – Under this menu the settings for performing an accurate simulation of the selected VRV systems can be performed
B) Timestep setting – This setting will alter the frequency of the simulation steps – 10 minute timesteps are usually suitable for an accurate simulation however timesteps as low as 2 minutes can be selected but are likely to produce very large file sizes
C) Weather file setting – It is possible to select a weather file to any of the available .fwt or .epw file types for the simulation
D) Simulation Results setting – select or overtype the name of the simulation results file, multiple simulation files can be used for comparison purposes
E) Simulate On Site Performance – On pressing this button the simulation will begin, the simulation itself comprises of three parts, an Apache simulation, a data gathering period where the module collects data from the simulation file, and finally the calculation of the whole system power inputs which represented by a progress bar
F) KW/h information – Once the simulation has run the delivered capacities from the VRV system appears here. The capacities are listed as Total Heating, Total Cooling, the combined Total capacity and finally the total condenser power input
G) Condenser Loads – In this area the simulated condenser loads appear once the simulation has completed this figure can be compared against the capacity of the condenser as a quick check to ensure there is likely to be sufficient capacity in extreme ambient conditions.
H) Room information – The information displayed here shows the floor area and total fan coil power input for the system selected under Systems & Outdoor Units
I) Simulated efficiencies – The derived efficiencies are listed as SCoP, SSEER and the total efficiency for the condensers. The bracketed figures underneath are the figures including all of the Fan coil and Branch Selector box power inputs and represent the complete system efficiency
J) Click here for an Excel report of the selected system components and overview. The first part of this report can be uploaded directly into VRV Xpress for piping & Wiring schematic generation.
Simulation Results
It is possible to obtain efficiencies in excess of the published figures with this module, very high or low efficiencies are also possible but can be symptomatic of Apache system or profile anomalies. Care should be taken to check the following before updating the simulated results to the model (The simulated results can be automatically assigned to the Apache systems in the relevant efficiency fields, which is performed when exiting the VRV systems module)
Very high efficiencies (typically exceeding 9)
Check your heating and cooling setpoints are correct, if at any point the cooling setpoint is lower than the heating setpoint then artificially high efficiencies will result.
Check that simultaneous heating and cooling is occurring, High efficiencies usually come from designs where heat recovery is optimised.
Check your simulated loads do not exceed the capacity of the loads run. A warning will appear if this occurs at the end of the simulation, this can sometimes produce very efficient results even though the system is not producing enough capacity to satisfy the room design load.
Very low efficiencies (around 3 or below)
System low efficiencies are usually indicative that the system requires re-selection. A number of considerations should be taken into account to alleviate the chances of inefficient system design which are listed below.
In Vista, look for points where the VRV system (not individual zones) is supplying small loads of a few hundred Watts or less, due to minimum operating loads VRV systems are less efficient at this point and can reduce total simulated efficiency.
In air tight buildings, low heating loads can be produced. In order to maximise the efficiency of the VRV system it’s possible to identify zones or rooms that require simultaneous heating and cooling. Placing these zones onto the same system will significantly increase the efficiency of the VRV system by use of the heat recovery effect.
Opportunities for heat recovery can be further explored by recovering waste heat and using it in areas where heat is required. Two examples of this are explained in the next section where the inclusion of producing high temperature domestic hot water and also using air curtains attached to the Daikin VRV system can significantly increase the efficiency of the building services within your model.
DHW Production
Daikin is renowned for its pioneering attitude towards technology and reusing waste heat to produce DHW is an innovation that can further increase the efficiency of building services.
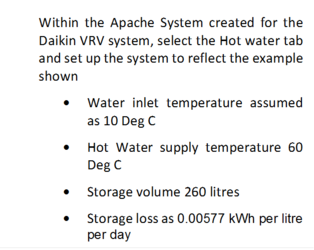
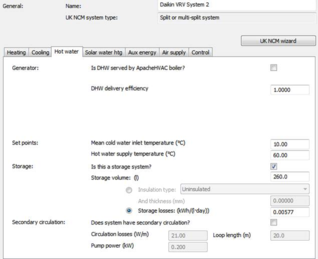
The system that is used within the VRV systems module is the Daikin HXHD series high temperature domestic hot water unit and the simulation is based on the system providing 60 Deg C flow temperatures (65 Deg C generation) with a 260 litre storage tank. In this configuration the tank can be reheated from cold (10 deg C) in 1 hour.
The recommended procedure for simulation is as follows:
Ensure that the relevant VRV system is assigned to the DHW demand in the tabular Space Data and is reflected in the thermal template for the room usage profile
The most accurate simulation comes from specifying a single period whereby the entire storage capacity is heated. Using profiles to determine casual demand will be indicative but the operation of the DHW system is more suited to providing a full tank of heated DHW as this increases the ability to determine efficient heat up periods by using waste heat rather than from heat produced by using primary energy from the condensers.
Open the VRV Systems module in Apache and select the relevant rooms to add an HXHD High temperature water system to the rooms that have a DHW demand. It’s important to note that if small DHW loads are in several rooms or zones then the VE will attribute all of these loads to the room that has the HXHD unit attached.
Adding the DHW to the room or zone is performed by right clicking on the room with the DHW load and selecting “Add DHW to room” from the pop up list. This will add a new row to the sizing grid purely for the DHW demand.
The loads and sizing run and consequently the simulations will now include for DHW performed by the Daikin VRV system.
