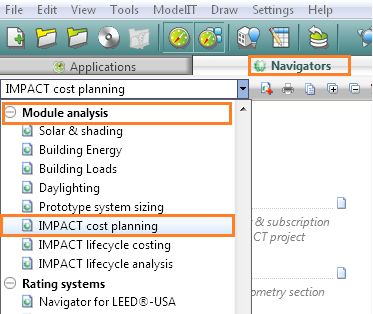
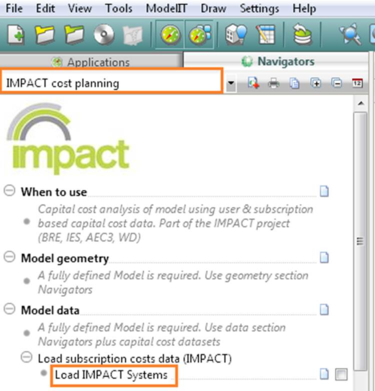
Load IMPACT systems
Within the IMPACT cost planning navigator, “Load IMPACT systems” when selected imports default system types that have been assigned capital cost and also operational cost that will be used in the CostPlanPro module. The default systems will then appear in the Apache system dialog.
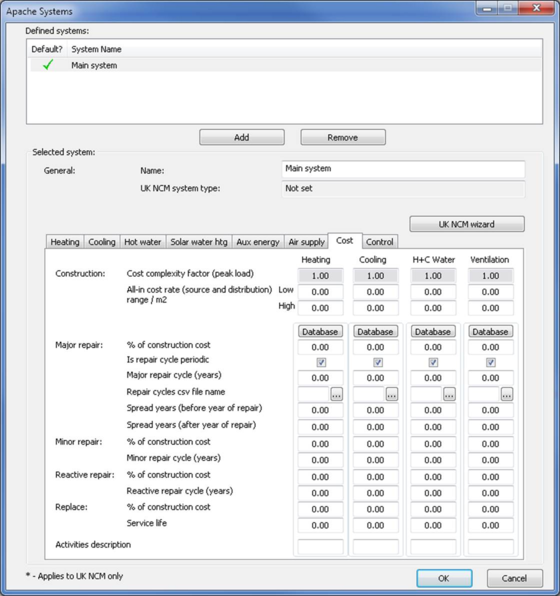
Before loading IMPACT systems:
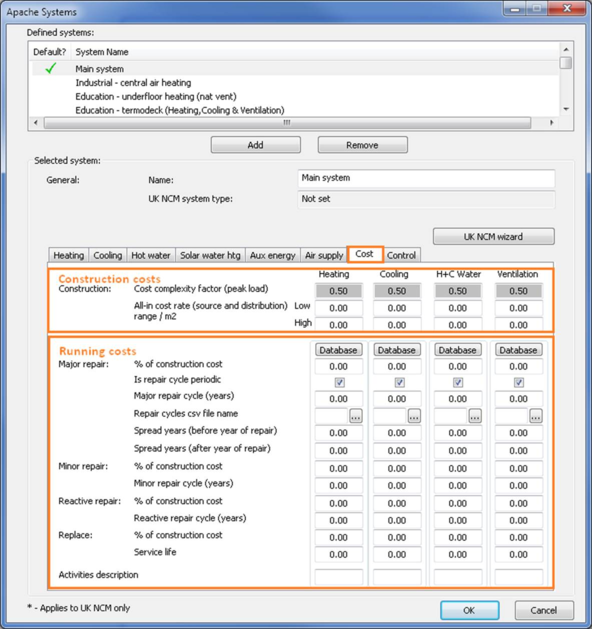
After loading IMPACT systems:
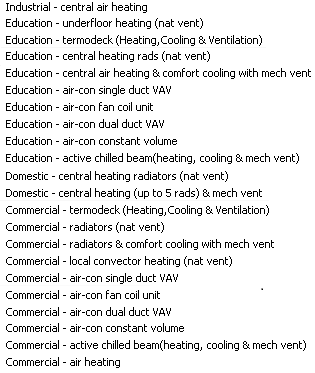
The full list of IMPACT systems are as follows (22 systems):
System costs assignment note
Systems cost is broken down into heating, cooling, hot water and ventilation costs per m² in the Apache system dialog. In reality, one particular system may not satisfy heating, cooling, or ventilation. For this reason, we have enabled the user to input their cost breakdown on the basis of heating equipment, cooling equipment, domestic hot water equipment and ventilation equipment. An example of such system would be radiators that provide heating, and possibly fan coil units that provide cooling and ventilation. Alternatively where one system may provide, heating, cooling and ventilation, the user will input total system cost in only one of the cost tabs (i.e., enter total system cost/m² in only one of the heating, cooling, or ventilation cost columns).
Within the default systems dataset, the following systems include total system cost for heating, cooling and ventilation, which have been assigned to the cooling tab only.
Commercial/Education – active chilled beam (heating, cooling & mech vent)
Commercial/Education – air con constant volume
Commercial/Education – air con dual duct VAV
Commercial/Education – air con fan coil unit
Commercial/Education – air con single duct VAV
Commercial/Education – termodeck (Heating, Cooling & Ventilation)
Cost templates
Two levels of templates are available:
· Schemed templates which contain a list of items based on model GIFA.
· Detailed templates which contain a list of items that extract relevant quantities from the 3D model.
A template has been provided for each of the following building types;
Commercial
Domestic
Education
Health
Industrial
Retail (frequent fit-in)
Retail (infrequent fit-in)
Each template stores a list of sections (categories and elements within a category) that needs to be included for a particular building type. It also stores the arrangement of these sections. Cost templates also provide a mechanism to price non-modeled items in the VE (e.g., fire alarm, client costs, etc.) by including these items in the template and providing a pre-defined rate.
To import a template to the project, please refer to section 1.4.3.1 .
Cost calculation
Cost plan is broken down into categories, which is then broken down into elements. Some elements are further broken down into sub-elements depending on the detail of the analysis required. The total cost is then a summation of the costs from bottom up: sub-element costs -> element costs -> category costs -> project cost.
To calculate elemental cost, cost plan uses a key variable called an “element code” as an instruction macro to instruct the module how to interpret the rate and quantity, and how to retrieve them from the 3D model. The following formulas are used to calculate element/sub-element cost:
Base cost = Rate x Quantity x Weight
Adjusted Cost £ = Base cost x LOC factor x TPI factor x scaling factor
Cost £ /m2 = Cost £ / GIFA
Tender price index (TPI) adjustment % = ((target TPI – base TPI) / base TPI) x 100
Therefore TPI factor = (1 + TPI adjustment % / 100) = target TPI / base TPI;
Weighting
Weighting can be applied at either project level or elemental level to adjust the cost locally.
At project level, a variable called scaling factor is defined to allow users to adjust the project cost according to the overall project complexity and quality. This variable can be set in the Project settings tab (see section 1.4.6.5 ).
At elemental level, weighting can also be applied directly to the cost rate or through the weight variable. Three types of elemental weighting are identified:
Construction complexity factor (CF)
Cost for the same construction type (e.g. wall) can vary significantly among different building forms. This variable offers a mechanism to adjust the construction cost based on model geometry complexity. Currently the geometry complexity uses the result of the following formula if it is within range [0, 1]. It takes 0 if the formula result is less than 0; it takes 1 if the formula result is larger than 1; it takes 0.5 if the external wall gross area is 0 or if model data is not available.
1 – building footprint area / external wall gross area.
CF is applied during cost calculation when relevant element codes are selected (See section 1.2.4.13 for details). This factor is then used to select a cost rate within the low and hi cost rate range of the corresponding construction.
The current CF used is displayed in the settings dialog which can be accessed by clicking the settings toolbar button (See section 1.4.3.5 ).
System complexity factor (SCF)
Due to the wide range of cost in systems for different buildings types or even for the same building type, this factor is introduced to allow users to adjust the system cost depending on their project at hand.
To use it, an Apache simulation run is required. The module will detect whether a simulation exists and use the simulation results to set SCF or use 1 by default. Once set, this factor is then used to select a cost rate with in the low and hi cost range of the corresponding system.
Construction weighting factor (CWF)
This is a generic factor specific and internal to each defined construction that allows similar constructions to have the same cost base figure but adjusted locally to take into account issues below the resolution of the VE. This allows a user to make copies of a default referenced construction and adjust the cost data without losing the referenced data. e.g.
Partition 13mm plasterboard / studs at 300mm CWF 1.0
Partition 13mm plasterboard / studs at 200mm CWF 1.2
The CWF is part of the construction definition. You can edit it on the CDB tabular edit dialog – Impact costs tab – Capital cost weighting factor, which is then passed to the cost plan weight column (see section 1.4.7.4 ). For constructions that are not modelled within VE, you can edit the cost plan weighting columns directly to set this factor.
Location modifier
This variable allows the project cost to be adjusted according to the where it is going to be build. The idea is that same project build in London for example might be more expensive than it is built in Glasgow. A look up table of a list of UK locations is available on the project settings tab (see section Error! Reference source not found. ). Selection of a location will set the location factor to be used.
Tender price index (TPI)
Tender price index allows cost data from different source based on different dates to be used together in a single cost plan. This includes both a base TPI and a target TPI. Base TPI tells when the cost data used is based on. The target TPI tells when the project is going to be build. These two variables are then used to compute an adjustment factor to adjust the overall elemental cost.
A lookup table containing a list of year & quarter is implemented on the project settings tab (see section 1.4.6.3 ). Selection of a year & quarter will set the target TPI to be used. However, users can also use this facility to look up an appropriate value for base TPI.
Element codes
Element codes act as an instruction macro to instruct the module how to interpret the elemental rate and quantity, weight, and how to obtain them from the model. It also tells the module whether the TPI factor and location factor should be applied to a specific element or sub-element.
This code will fix rate as 0.
By item (quantity fixed as 1)
|
1
|
By item (quantity fixed as 1)
|
This code will fix quantity as 1.
User entered
It’s up to the user to interpret the rate and quantity.
When the whole building costs data is available, this item brings up a dialog list populated from the Building estimates dataset; the list shows the building types/subtypes available. Once selected this text string is placed in the element field and the building cost selected from the range using the selected complexity / quality factors is entered into the rate field. Quantity is set to GIFA. Currently this code is not used due to lack of whole building costs data.
Non-selectable codes
|
5
|
NULL
|
|
6
|
Auto sub-element
|
These codes are non-selectable on the module interface and used for internal calculation and display purposes.
· 5. NULL: non-selectable. On manually creating a sub-element, code for the element will automatically become NULL. All columns except for ID, description and code of the element will turn blank.
· 6. Auto sub-element: non-selectable. When sub-elements are automatically being added due to the selection of a particular element code (Any code listed in section 1.2.4.10 , 1.2.4.12 , 1.2.4.13 , 1.2.4.14 , 1.2.4.15 , 1.2.4.16 , 1.2.4.19 , e.g., 124. External Wall by CDB item rate & area), all these auto sub-elements are will be given this code.
Perimeter codes
|
57
|
Perimeter of all windows + doors
|
|
58
|
Perimeter of all rooms
|
Code 57 retrieves the inside perimeter (m) of all windows and door (external and internal) into quantity. This value is for use with opening carcassing costs.
Code 58 retrieves the inside perimeter (m) of all spaces taken as the floor plane perimeter. This value is for use with edging carcassing costs (skirting etc.).
This is the volume of the building. Assign this to quantity.
Codes getting back counting of specified object
|
3
|
Number of storeys
|
|
31
|
Total Number of Windows
|
|
33
|
Number of External Windows
|
|
35
|
Number of Internal Windows
|
|
41
|
Total Number of Doors
|
|
43
|
Number of External Doors
|
|
45
|
Number of Internal Doors
|
|
60
|
Total Number of Roof lights
|
Codes getting back specified area
|
7
|
NIA
|
|
10
|
Footprint Area
|
|
11
|
GIFA
|
|
12
|
Ground Floor Area
|
|
13
|
Upper Floor Area
|
|
14
|
Roof Area
|
|
15
|
Suspended ceiling Area
|
|
16
|
Floor coverings Area
|
|
21
|
External Wall Area
|
|
22
|
Internal Wall Area
|
|
23
|
External Wall Glazed Area
|
|
24
|
Solid ceilings area
|
|
32
|
Total Area of Windows
|
|
34
|
Area of External Windows
|
|
36
|
Area of Internal Windows
|
|
42
|
Total Area of Doors
|
|
44
|
Area of External Doors
|
|
46
|
Area of Internal Doors
|
|
52
|
Total Area of Windows + Doors
|
|
54
|
Area of External Windows + Doors
|
|
56
|
Area of Internal Windows + Doors
|
|
61
|
Total Area of Roof lights
|
NIA: See 1.3.7 for details.
Footprint area: the floor area in contact with the ground
Suspended ceilings and floor finishes codes
|
15
|
Suspended ceiling Area
|
|
16
|
Floor coverings Area
|
Code 15 will retrieve all suspended ceilings materials assigned to the constructions of "Internal Ceiling/Floor” and "Roof" type in the model, listing each material as a sub-element.
Code 16 will retrieve all floor coverings materials assigned to the constructions of "Internal Ceiling/Floor” and "Ground/Exposed Floor" type in the model, listing each material as a sub-element.
The quantity of each sub-element will be the area of the parent construction. The cost rate will be the rate of the relevant material. The id will be empty. The name will be “[construction id] material name”.
Percentage codes
These are codes from 100 to 110. See full list below:
|
100
|
Percentage of building costs (Cat.1-7)
|
|
101
|
Percentage of construction costs (Cat.1-8)
|
|
102
|
Percentage of construction costs (Cat.1-9)
|
|
103
|
Percentage of construction on-costs (Cat.9-11)
|
|
104
|
Percentage of construction & on-costs (Cat.1-11)
|
|
105
|
Percentage of project on-costs (Cat.12-13)
|
|
106
|
Percentage of project cost exc. rick & inflation (Cat.1-12)
|
|
107
|
Percentage of project & on-costs (Cat.1-13)
|
|
108
|
Percentage of project total cost (Cat.1-14)
|
|
109
|
Percentage of category 14 construction costs
|
|
111
|
Percentage of category 1 construction costs
|
|
112
|
Percentage of category 2 construction costs
|
|
113
|
Percentage of category 3 construction costs
|
|
114
|
Percentage of category 4 construction costs
|
|
115
|
Percentage of category 5 construction costs
|
|
116
|
Percentage of category 6 construction costs
|
|
117
|
Percentage of category 7 construction costs
|
|
118
|
Percentage of category 8 construction costs
|
|
110
|
Percentage of overheads and profit costs (Cat. 10)
|
They consist of the following two types.
· Percentage of categories x-y costs (x and y are NRM ids):
This will instruct the module to place the sum of the costs of the specified categories into the quantity and treat the rate value as a percentage figure (9 = 9%).
· Percentage of category x costs (x is a NRM id):
This will instructs the module to place the cost of the specified category into the quantity and treat the rate value as a percentage figure (9 = 9%).
Percentage codes are the only codes that TPI factor and location factor are not applied.
CDB item rate & area codes
|
120
|
Ground Floor by CDB item rate & area
|
|
121
|
Upper floor by CDB item rate & area
|
|
122
|
Roof by CDB item rate & area
|
|
123
|
Roof light by CDB item rate & area
|
|
124
|
External Wall by CDB item rate & area
|
|
125
|
Internal Wall by CDB item rate & area
|
|
126
|
External Window by CDB item rate & area
|
|
127
|
Internal Window by CDB item rate & area
|
|
128
|
Door by CDB item rate & area
|
These items import all the specified constructions assigned in the model. Each construction is assigned to a sub-element. Quantity is area of the construction. The average cost rate (low + high / 2) is inserted in to the rate field. CWF is inserted into the weighting column. Construction name will be the name of the sub-element
For example, code “124. External Wall by CDB item rate & area” instructs the module to process all external wall constructions assigned to the model and retrieve their rate, quantity and weight in the model to calculate the construction costs. Each external wall construction in the model will be displayed as a sub-element.
CDB item rate & area & CF codes
|
140
|
Ground Floor by CDB rate & area & CF
|
|
141
|
Upper floor CDB rate & area & CF
|
|
142
|
Roof by CDB rate & area & CF
|
|
143
|
Roof light by CDB rate & area & CF
|
|
144
|
External Wall by CDB rate & area & CF
|
|
145
|
Internal Wall by CDB rate & area & CF
|
|
146
|
External Window by CDB rate & area & CF
|
|
147
|
Internal Window by CDB rate & area & CF
|
|
148
|
Door by CDB rate & area & CF
|
These items import all the specified constructions assigned in the model. Each construction is assigned to a sub-element. Quantity is the area of the construction. The relevant cost rate is selected using CF (where in the range of low and high) and inserted in to the rate field. CWF is inserted into the weighting column.
System by type, area & SCF codes
|
151
|
Heating system by type & area & SCF (all in cost)
|
|
152
|
DHW system by type & area & SCF (all in cost)
|
|
153
|
Cooling system by type & area & SCF (all in cost)
|
|
154
|
Vent system by type & area & SCF (all in cost)
|
This item imports all of the specified apache systems assigned to the model. Each system is assigned to a sub-element. Quantity is area conditioned. Rate is selected from the all in cost rate range of the system using the system complexity factor SCF. To use the SCF, users must carry out an Apache simulation. If no simulation run exists, the average cost is used. 1.0 is inserted into the weighting column.
On performing an apache simulation, please refer to section 1.3.9 .
Area served by lighting type (int gain)
|
161
|
Area served by lighting type (int gain)
|
Element code, “161” retrieves the floor area of rooms that have internal lighting gains assigned.
The cost rate is entered by the user manually. Composite cost templates will have lighting as a GIFA rate; this permits greater definition by the user.
On setting up room lighting, please refer to section 1.3.4 1.3.3 .
PVs by type and area
This item imports all the PV items defined under apache. Each PV item is assigned to a sub-element. Quantity is area. The cost rate is entered by the user manually.
On defining PV items, please refer to section 1.3.6 .
Wind turbine by Kw
This item imports the turbine defined under apache. Quantity is turbine size in kW. The cost rate is entered by the user manually.
On defining a turbine, please refer to section 1.3.6 .
CHP by kWt
This item imports the CHP defined in the renewables tab in the Apache module . Quantity is CHP size in kWt. The cost rate is entered by the user manually.
On defining a CHP, please refer to section 1.3.6 .
Component by item rate
|
200
|
Component by item rate
|
This code imports cost data for all assigned model components. Each component is assigned to a sub-element. Quantity is 1 for each component. The cost rate from the component attributes is inserted in to the rate field. Currently this feature is not fully implemented in VE, so users need to use CostPlanPro/LCC to edit the component rate directly under the rate element field.
Please refer to section 1.3.8 to find information on setting up components.
Occupant no. (max)
This code imports the number of people assigned to the model
Please refer to section 1.3.5 to find information on setting the number of occupants.
Energy utility costs related codes
The following items retrieve the peak energy data from apache loads. Quantity is peak kw. The cost rate is entered by the user manually.
|
180
|
Total gas peak energy kw
|
|
181
|
Total electrical peak energy kw
|
The following codes (182 - 192) import data from the defined aps file(s) and the Vista tariff selections.
|
189
|
Fuels by type Kwh & tariff data (including renewables)
|
This code will list all fuels used including renewables. Each fuel will be a sub-element. Quantity is annual energy consumption in kWh. The rate & fixed charge is from the tariff data (in the case of time dependent rates, an average rate for the total consumption will be imported).
The following codes list each individual fuel type.
|
182
|
Primary energy elec Kwh & tariff data
|
|
183
|
Primary energy nat gas Kwh & tariff data
|
|
184
|
Primary energy LPG Kwh & tariff data
|
|
185
|
Primary energy oil Kwh & tariff data
|
|
186
|
Primary energy coal Kwh & tariff data
|
|
187
|
Primary energy biomass Kwh & tariff data
|
|
188
|
Primary energy biogas Kwh & tariff data
|
The impact of renewables on energy utility costs is included in the following codes.
|
190
|
PV energy generated Kwh
|
|
191
|
Wind energy generated Kwh
|
|
192
|
CHP energy generated Kwh
|
On running an apache simulation, please refer to section 1.3.9 .
Preconditions
Prior to launching the CostPlanPro module, a few things need to be setup.
Make construction adjustments and assign constructions
This can be performed via the “IMPACT cost planning” navigator or by switching to the apache module. Apache toolbar:
The general steps to setup the model constructions are:
· Setup constructions using the constructions database

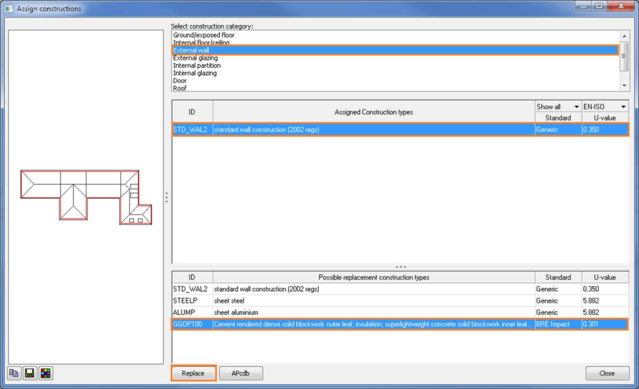
· Assign the newly created constructions to the current model using assign constructions

You can then switch to the CostPlanPro module to see the changes.
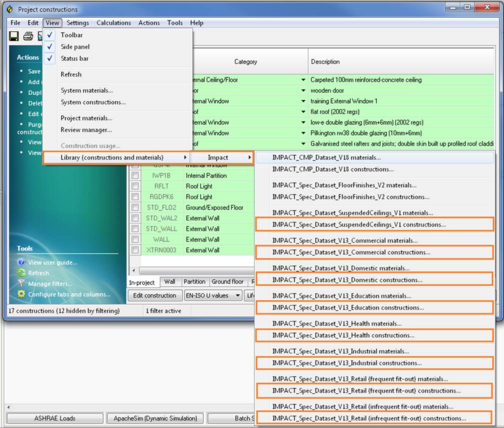
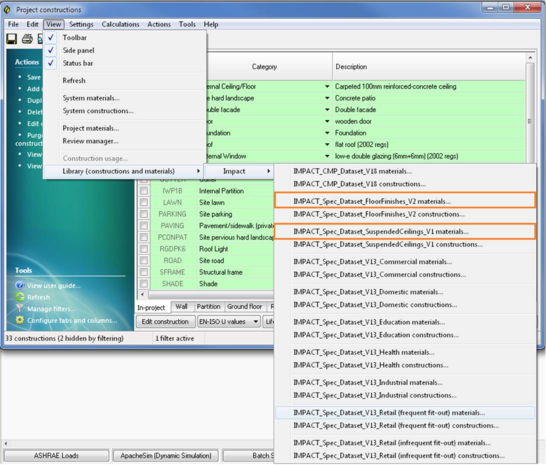
Setting up green guide constructions
Depending on the analysis at hand, the user may select constructions/materials from the BRE Green Guide dataset, if they are suitable for the project. The main advantage of using constructions/materials from the BRE Green Guide, is that they can also be used within the LCC and LCA module. Select one of the Green Guide construction (highlighted in orange) datasets from the view menu under the construction database dialog:
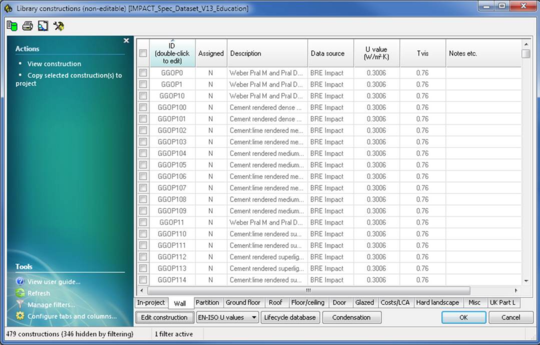
Selecting one of the orange highlighted items will display the following dialog:
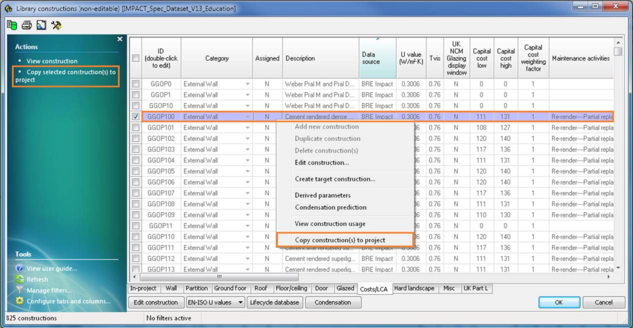
Choose one of the constructions,then right click and select “Copy construction(s) to project” or click “Copy selected construction(s) to project” menu item on the Actions menu on the left:
The copied construction will then appear in the Project constructions list:
Press OK. Then select assign constructions to assign imported green guide constructions to the model.
Switch to CostPlanPro, check element with code “124. External wall by CDB item rate & area” is selected.
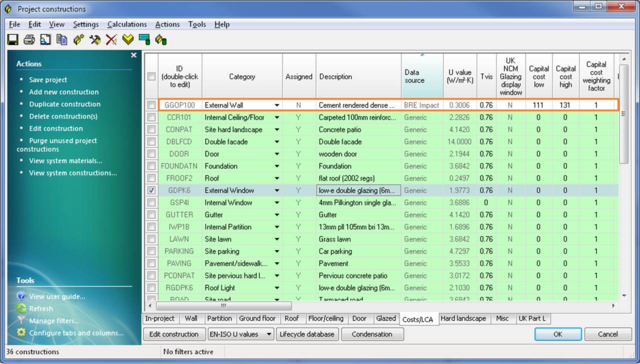
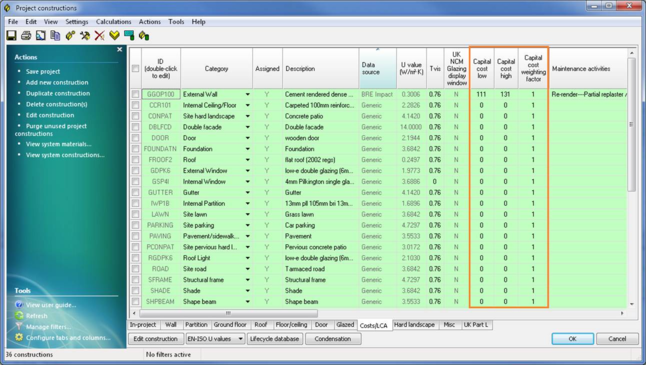
Edit construction capital costs data
The user can edit the capital costs data (capital cost low, capital cost high and construction weighting factor CWF) of any project constructions through the “Costs/LCA” tab of the project constructions dialog by double clicking the values.
Assign floor finish and suspended ceilings materials
Floor finishes and suspended ceilings will have cost data edited at material level.
The general steps involved to setup a floor finish or a suspended ceiling are:
· Open the Green Guide floor finish/ suspended ceiling dataset through the constructions database
· Select a material of interest
· Add the copied material as a layer of a construction of interest within project construction dialog.
· You can then switch to the CostPlanPro module to see the changes.
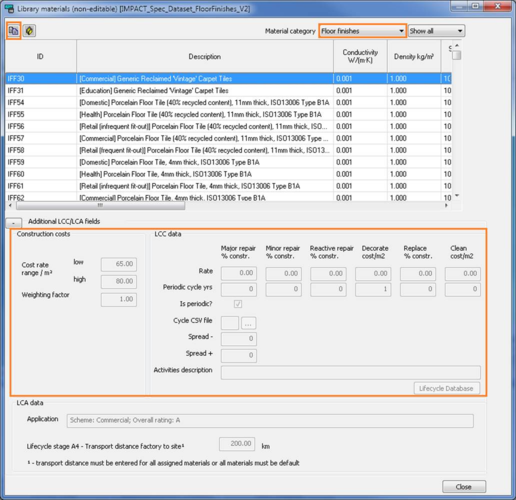
Open the Green Guide floor finish or suspended ceilings dataset
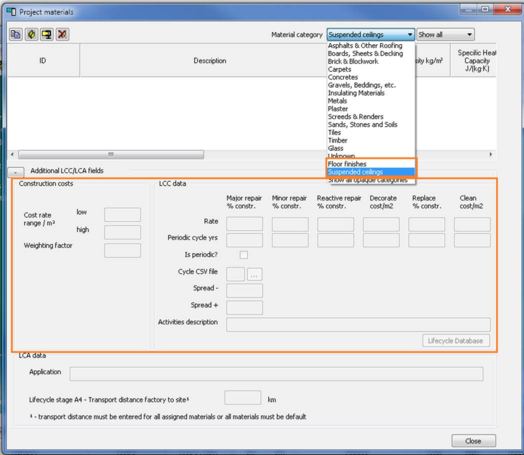
Select for example the floor finish dataset, then the selected materials dialog will appear. From here the user will select either “floor finishes” or “suspended ceiling” materials. The following dialog will then appear;
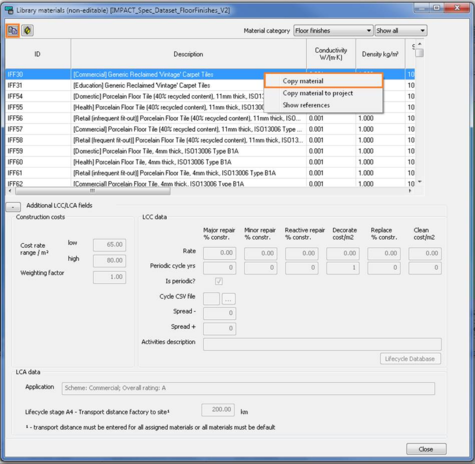
Select the relevant floor finish that will be imported to the project, then click the copy button in the top left hand corner, or right click and select copy material.
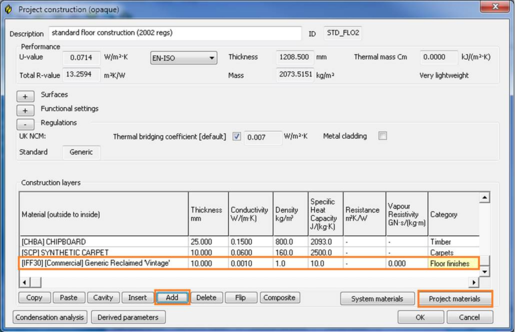
Double click on the construction in which you want to add the copied material, the user can then choose to add or insert the copied material. The add button will add the copied material to the bottom of the construction make-up and the insert button can be used to insert the copied material between two layers.
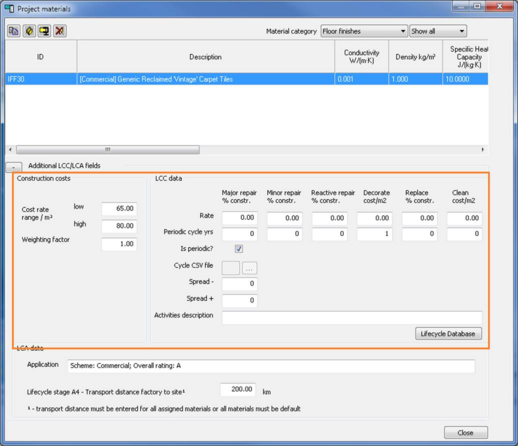
Once the material has been copied, it is automatically added to the “project materials” list, which can be viewed by selecting project materials.
As you can see below, all the cost items are ready for editing:
When the constructions have been assigned to the model, the user will then select the CostPlanPro module. In order for the assigned constructions to be included in the cost calculation, the user must first add and select the relevant “element code” which will retrieve the cost data assigned to the constructions previously set up.