Specifying Data for Output
The primary aim of Vista is to allow the user to obtain a graphical or tabular form of results very quickly. Once a method of output has been selected from the output toolbar, the latest chart dialog reflects any changes selected by the user. As soon as you click onto a new results file or variable, that change should be reflected in the display straight away, although there may be some delay when large data quantities are being processed.
Specifying Results
When Vista is manually selected by the user, the system automatically loads the results files stored in the Vista sub-folder of your project. If you wish to add new files to look at, you can select File > Open from the Vista menu, or you can click the Open File button in the Output toolbar. Any new files are added to the simulation results files list at the bottom of the screen.
When Vista is called automatically at the end of a simulation run, you don't need to specify the results file. The newly created file is opened automatically for you. Results are sorted into the 4 main types; heating load results either from ApacheCalc or ApacheLoads are shown in red text and have the suffix *.htg, cooling load results either from ApacheCalc or ApacheLoads are shown in blue text and have the suffix *.clg. ApacheSim dynamic thermal simulation results are shown as black text and have the suffix *.aps, weather files (*.fwt or *.epw) are shown with green text. The drop down box above the results can be used to sort the different results.
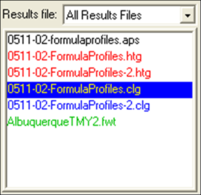
When you want to specify a file to be used, just click onto it. All highlighted files will be used for results display. You can deselect a file by just clicking onto it again. Note that results files from leap year simulations cannot be co-selected with results files from non-leap year simulations; results from leap year simulations include 29th February if the simulation was run over that date, which is taken into account in all plots and analyses in Vista and VistaPro.
Results files are closed by selecting File > Close from the Vista menu. All currently highlighted files are closed, and removed from the file list.
Specifying Variables
All available variables are displayed in the dialog bar at the bottom of the screen. There are two different types of variables: those for the model simulation and those for the weather. The currently selected variables are highlighted in the Single lists. The Multi-select lists are just ways of short-cutting selecting various common combinations of single variables. If you select None in the Multi-select box, it will clear all highlighted variables. To deselect a single variable, click on it a second time.
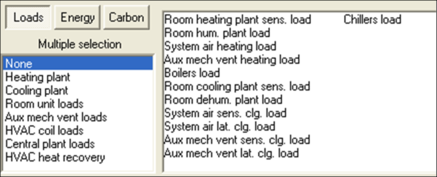
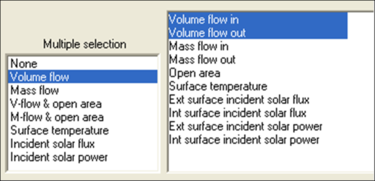
Model Variables
These variables are obtained from the steady state calculations and Apache simulation results files. When you navigate to different levels of the building, you will notice the listed variables change.
When you are at the model level (i.e. more than one room is displayed), and at least one room is selected, then the variables which are relevant to rooms are displayed.
When you can see more than one room, but no room is selected, or you click Model on the Model Browser, then you can access the model level variables (total energy loads, etc).
Air flow rates etc. can be accessed by navigating down to the surface level and selecting an opening. This assumes that you have incorporated air flow into the simulation using MacroFlo.
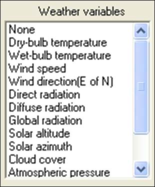
Weather Variables
These variables are obtained from the weather file which is associated with a specific simulation results file. As with the Model simulation variables, you can select common groups of variables. The ‘None’ selection removes all previous selections.
The weather data is not extracted from the simulation file, but is instead extracted from the weather file which is associated with a particular simulation. Individual weather files can also be viewed separately.
Specifying Parts of the Building
You can use the view toolbar to control how you view the model, in the same way as for other application workspaces such as ModelIT.
Please note that when the blue arrows (up/down) are clicked, then the variables which are accessible will change accordingly.