Once you have assigned the rooms in your model to HVR unit groups as appropriate, the model should be ready to simulate. The relevant Navigator actions will be enabled when you click the checkbox to the right of the Assign selected rooms to the appropriate HVR® system action (acknowledging that you have completed the action).
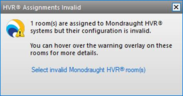
In order to proceed to simulation, you should perform the Ensure that all rooms assigned to HVR® systems are valid action – this will attempt to correct any problems with the HVR data on any room that is marked with an exclamation mark.
If one or more rooms could not be corrected automatically, an alert should display at the bottom-right of the VE window indicating the number of rooms that need manual attention.
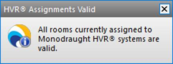
In this situation, you should review the problems for each invalid room by hovering the mouse over each room’s exclamation mark – you can then take appropriate action to resolve the issue and then retry this step. Once all assigned rooms are valid, clicking on action again should display the following alert at the bottom-right of the VE window:
You should then click the checkbox to the right of the Ensure that all rooms assigned to HVR® systems are valid action to enable the action for assigning HVR to an HVAC system file.