The Library facility has been designed to give the user complete control over import/export operations, covering any element(s) of an ApacheHVAC file (network components, plant components, profiles…).
It supersedes previous import-only facilities which were limited to ASHRAE 90.1 PRM baseline systems and variants thereof (“Prototype systems”), sharing a single common set of plant equipment and profiles.
Import from library
The Import from library button

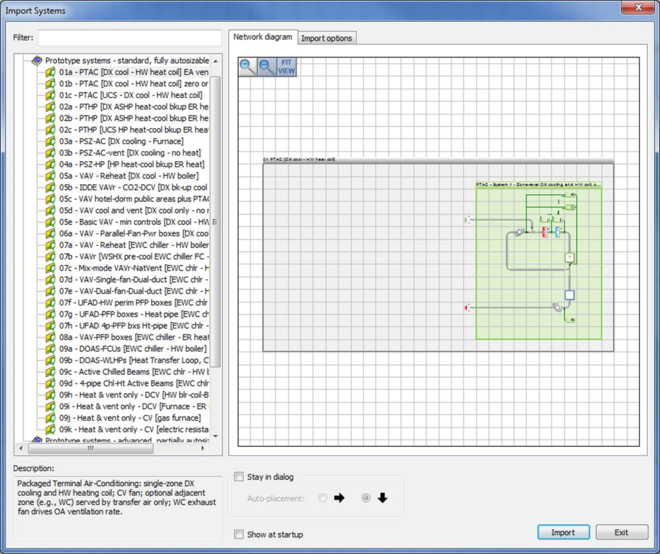
on the toolbar brings up the Import Systems dialog, as below.
The tree hierarchy consists of the following folders, in order:
· Prototype systems – standard, fully autosizable (See Section 8)
· Prototype systems – advanced, partially autosizable (See Section 8)
· User exported systems – Local User-defined hierarchy of folders and files in a central location on this computer, populated by previous usage of the standard Export facility (Section 5.2).
· User exported systems – Any There are two possibilities here:
- The user can browse to an .asp anywhere on their computer or connected LAN, if any.
- Below this is a list of all .asp files that have been previously exported (by this computer) to “Any” location.
· Simplified systems These are the same as the legacy Wizard systems (Section 5.3) but with a 1-layer multiplex (unassigned) instead of the zone replication facility. Multiplexes are (in network terms) equivalent to replicated zones, but provide much extra functionality (see Section 6).
· 90.1 PRM Baseline systems (See Section 8)
· Prototype equip, profiles, fuel codes only This provides only the plant equipment, profiles and fuels referenced by all PRM Baseline systems and Prototype systems. No network objects.
· Folders containing systems tailored to specific methods or rating systems, other than PRM: for example GreenMark (Singapore). The relevant help facility may have guidance on their use.
In both “User exported systems” folders, only .asp files that can be opened by the current <VE> version will be listed.
As you select each file in the tree in turn, the displayed Network diagram and Description text will both update. The Network diagram can also be zoomed in or out, or fitted to view using the three buttons at top left.
For placing the imported network within the current open network, two methods are available as follows.
If Stay in dialog is left unchecked, the Import button will close the dialog and provide the user with a floating image of the import which they must anchor anywhere in the canvas by clicking at a valid location. Alternatively, the placement functionality available in previous releases can be replicated by checking Stay in dialog then using the (now enabled) arrows to select automatic placement by the Import button either to the right of, or below, all existing network objects.
When staying in dialog, the Exit button is used to close the dialog.
There is an optional checkbox Show at startup to have the Import library dialog always shown at the start of each ApacheHVAC session, in a similar fashion to the ApacheHVAC wizard in earlier releases.
NOTE: Presently, it is possible to have non-unique identification numbers assigned to a particular type of HVAC network imported from the library into two different ApacheHVAC files (.asp files) within the same project. Because these ID numbers are used for linking of Loads Data spreadsheets to each HVAC network, it can be confusing when two networks in two asp files have a loads data spreadsheet of the same name. Therefore, it is recommended that upon loading an HVAC network form the library, users should double-click on the bar at the top of the gray system frame and provide a unique name for the system.
While naming specific systems will remain a good habit, the noted implications with respect to coupling of the information for autosizing will cease to be of concern when this coupling is eliminated as part of bringing the functionality of the Loads Data spreadsheet into ApacheHVAC in a future release.
Import options
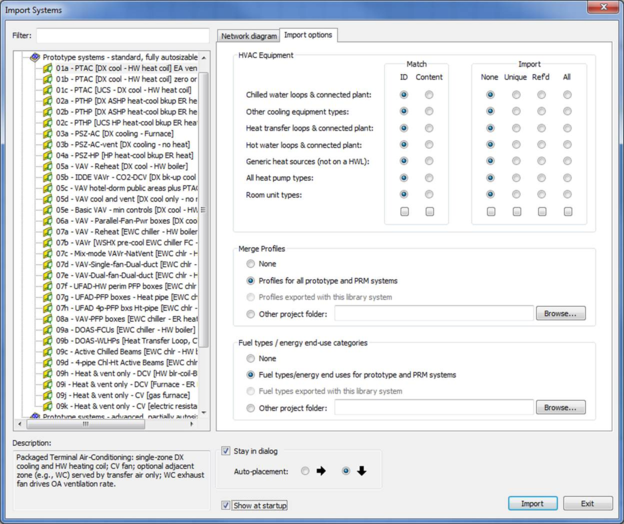
The Import options tab is shown below.
For each non-network element of the selected file you have complete control over how, or whether, it is imported.
For plant equipment there are two types of control, firstly on object comparisons and secondly on presence or usage of objects.
Object comparison
When comparing objects in the proposed import file (or “source”) against those in the currently open file (or “target”), you may match on either unique ID only, or on all content data. In this context “content data” will include profiles, and data within any linked objects. (Exception: Heat recovery providers (cooling plant) compare only the names of the Recipients (heating plant), not their data).
You would prefer to match on ID when importing between two files that are known to have common plant (in particular the PRM baseline systems and Prototype systems based on them) and you want to guarantee no duplication, even if any plant in the source file has been autosized, or otherwise has modified content.
Note: plant IDs are an internal concept only, and are not visible anywhere in the user interface. They should be thought of simply as a way of addressing a set of systems with common plant, such as the installed PRM Baseline systems and Prototype systems.
You would prefer to match on Content when the target and source files are known to have different plant data (in particular, as a result of previous autosizing on either or both sides), and you wish to preserve this. Another scenario would be where the origin (and hence IDs) of the plant data are either non-standard or unknown.
The default object comparisons are as follows:
· for all pre-installed systems: Match on ID
· for user-exported systems (either Local or Any): Match on Content
Presence or usage
The options None / Unique / Referenced / All function, in conjunction with the currently set Matching rule, as follows and listed in order of increasing inclusivity:
· None: No plant of this type will be imported.
· Unique: Only referenced plant of this type which is unique (under current Matching rule) to the source file will be imported.
· Referenced : All plant of this type which is referenced by objects in the source file will be imported. Any that Match plant in the target file will be duplicated.
· All: All plant of this type in the source file will be imported. Any that Match plant in the target file will be duplicated.
Note 1: Unique is the only option which may demand plant reassignment in imported network objects, in order to pick up the appropriate plant items already present in the target file.
Note 2: The numbers “(1)”, “(2)” etc will be added to any imported Reference where this is necessary to avoid duplication of References in the final network.
Note 3: The Heat source assignment to DHW (if any) in the target file is not modifiable by an Import operation, therefore the DHW assignment (if any) in an imported Heat source will be automatically removed and the user informed.
The default presence/usage options, listed below, are intended to facilitate the import of needed plant/equipment items while avoiding unwanted duplicates:
· When the first library system is imported to empty HVAC file, the default import option = All
· When any subsequent installed system is imported into a non-empty file, the default = None, only if no extra required/referenced equipment is present; if not, the default = Referenced
· When any subsequent User-defined system is imported, the default import option = Unique
On either selecting any None option, or changing the selected network while None option(s) are selected: if one or more of the None options would produce an invalid network after the import, the Import button is disabled and a checkbox with red warning text is exposed. The user must check this checkbox to enable the Import button, thereby showing that they understand that the resulting network will be invalid.
A note for upgraders regarding the two previous v6.4.0.5 options for importing into non-empty networks:
“Duplicate heating/cooling plant” ON in v6.4.0.5 equates to Match ID / All in VE2012 onwards.
“Duplicate heating/cooling plant” OFF in v6.4.0.5 equates to Match ID / None in VE2012 onwards.
Profiles options
The options for merging profiles build on the previously available functionality, in that the Prototype / PRM profiles are still distinctly labeled as such. These are the profiles required by, and are the default option for, all the installed systems, with the exception of the Simplified systems.
For Simplified systems and all User-exported systems, the default Profile option is None.
The user can export profiles with a system (see 5.2), and the option Profiles exported with this Library system is available to merge these when re-importing that system.
The final profiles option Other project folder allows the user to browse to any project folder (at the .mit level) and that project’s profiles will be merged in the same way as they would be through the Building Template Manager. Note: when the import is via User Exported systems – Any, and the browsed folder is a project folder containing profiles, then this folder will be automatically copied to the profile option Other project folder.
Fuel type options
The options for setting (NB: not merging) fuel types build on the previously available functionality, in that the PRM energy end-use categories are still distinctly labeled as such. These are required by, and are the default option for, all the installed systems, with the exception of the Simplified systems.
For Simplified systems and all User-exported systems, the default Fuel type option is None.
The user can export fuel types with a system (see 5.2), and the option Fuel types exported with this Library system is available to set these when re-importing that system.
The final profiles option Other project folder allows the user to browse to any project folder (at the .mit level) and that project’s fuel types will be imported. Note: when the import is via User Exported systems – Any, and the browsed folder is a project folder containing fuel types, then this folder will be automatically copied to the profile option Other project folder.
Export to library
The Export to library button

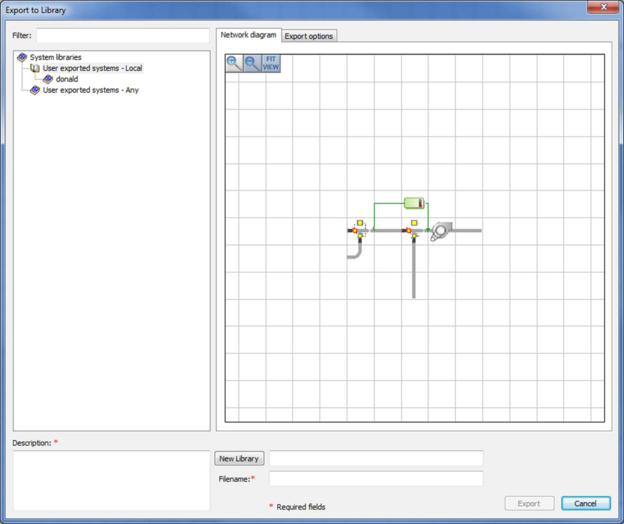
on the toolbar brings up the Export dialog, as below.
Note that (by default) the Network diagram shows only those network objects that were selected prior to initiation of the Export. This can be changed to None or All on the Options tab, see 5.2.1.
When first exporting to the Local hierarchy, a folder must be created by entering its name in the field next to New Library then clicking the button. This new folder becomes the selected export destination folder.
If desired later, any number of additional folders and sub-folders can be created by use of New Library.
When exporting to the Any destination, click in the tree to browse to any folder on the current machine or LAN (if any). New Library will change to Folder: and the OK’ed folder will be echoed here.
Filename and Description are both compulsory, as indicated by red asterisks. The Filename must be unique within the currently selected destination folder. When the following three conditions hold:
· A Local destination folder has been selected or Any folder has been browsed to
· A valid filename has been entered
· Description text has been entered
the Export button becomes enabled. This button performs the export operation and also closes the dialog.
Export options
When Include profiles is checked, the project’s current profiles will be exported.
When Include fuels is checked, the project’s current fuel codes will be exported.
The Plant options define how each of the seven distinct plant equipment types will be exported.
· None: No plant of this type will be exported. (Note: such a file is not valid on its own).
· Ref’d (default): Export all plant of this type which is referenced by those objects to be exported.
· All: Export all plant of this type.


