This section contains more detailed information about how to run the FLUCS program.
Click on the icon for FLUCS from the IES program group. You must open a new or existing project file before any of the facilities become available. You must enter data via the tabbed dialogue boxes before designing any luminaire layouts or calculating any detailed lighting levels. Reviewing the contents of the lighting database does not require any data entry via the tabs.
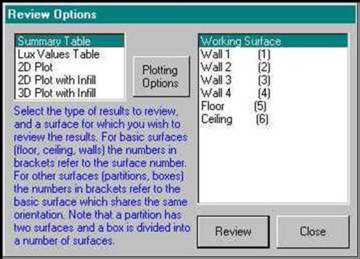
Review Options
When you select Review from the top-bar menu you will be presented with a choice:
· Input data
· Results
· Database
The Input data option allows you to review all the input data. The Results option is available after calculations have been performed to review the results. The Database option is shown below:
· Luminaire data
· Lamp data
· LLMF data
· List luminaires
· List lamps
· List LLMF curves
If you select one of the top three options you will be asked for the name of the luminaire, lamp or LLMF curve that you wish to review. The List options enable you to view the luminaires, lamps and LLMF curves within the database. The luminaire option allows you to list luminaires by manufacturer or use categories.
Calculations
Database C alculations
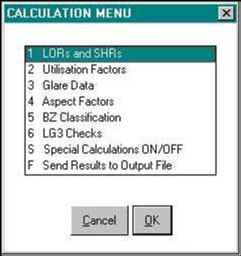
When you select the Database option from the top-bar menu and then select Calculations, you will be asked to enter the name of the luminaire for which you wish to perform the photometric-data calculations. Then you will be presented with the full calculation menu:
LORs and SHRs
This option is used to calculate the upward and downward light-output ratios (LORs) and the maximum, maximum transverse, and nominal spacing-to-height ratios (SHRs) for the given luminaire. The calculation method is based on the procedures in CIBSE TM5.
Utilisation Factors
This option calculates the standard utilisation factors for the nine given room indices (0.75 to 5) following the procedures given in CIBSE TM5.
Glare Data
The standard uncorrected glare indices for the nineteen standard room sizes of X and Y for reflection factors of 70 (ceiling), 50 (walls) and 20 (floor) are calculated. For each room size, values for endwise and crosswise viewing are given based on the procedures in CIBSE TM10.
Aspect Factors
The parallel and perpendicular aspect factors for the luminaire are calculated at five-degree intervals from 0 to 90 degrees.
BZ Classification
This option calculates the British Zonal (BZ) classification for the luminaire within the nine standard room indices (0.75 to 5).
LG3 Checks
This option checks that the luminaire selected meets categories 1, 2 and 3 for the design of downlighting, from the CIBSE Lighting Guide LG3, 'Areas for Visual Display Terminals'.
Special Calculations
The Special calculations option allows you to set up the calculation parameters for which you will be prompted further.
Design C alculations
The design calculations are based on the assumption that the room is rectangular, that the luminaires are all of the same type and are all mounted in a symmetrical layout at the same height. A number of design options are provided:
· Set limiting glare index.
· Fix spacing and offset in length.
· Fix spacing and offset in width.
· Try all valid lamps for the chosen luminaire.
Each solution will be checked against the following criteria:
· Illumination is between 80% and 150%.
· Maximum corrected glare index is less than the limiting glare index.
· The luminaires will fit in the room.
· The spacing between the luminaires does not exceed the maximum spacing-to-height ratio.
· The offset from the wall to the first luminaire does not exceed half the maximum spacing-to-height ratio.
If a nominated solution is not selected then the program will calculate the ideal number of luminaires required to illuminate the room to the design level; it will then work out the number of columns of fittings in the length and the number of rows in the width. The program will try four different schemes, using the nearest lowest and highest numbers in the length and width.
Only schemes that satisfy all design checks can be selected for the output file. If a scheme fails, the program will provide a reason and terminate the calculation for that scheme.
In order to start the calculations for a room, select the Calculations option from the top-bar menu and then select Design Luminaire Layout. You will then be asked whether you wish to view the calculation results in more detail. This is useful when determining why a scheme has failed. The information given includes the following:
· Ceiling, wall and floor void reflectances (as defined by CIBSE TM5).
· Room index and utilisation factor.
· Glare indices and correction factors (for glare calculations).
· Spacings and offsets (if nominated solution).
After performing a successful lighting-design calculation, you will be asked if you require the data for this to become the basis for a detailed point-by-point calculation, and if you wish this data to be loaded into the tabs for room-analysis details and luminaire positions.
Point-by-Point Analysis Calculations
To start the calculations, select the Calculations option from the top-bar men and then select Point-by-Point Analysis.
The program performs three different types of calculations:
· Electric-lighting calculations.
· Daylighting calculations.
· Electric daylighting calculations.
The program will only perform the selected calculation procedure if the relevant data has already been entered and is without errors, but you will be warned accordingly if data is missing.
Electric-Lighting Calculations
(See also Full Inter-Reflection Calculations)
Selecting this option will cause the program to calculate the illumination level on the working plane, due to each luminaire. If a luminaire has been deleted, then it will be ignored in the calculations. Please note that once you have started this calculation the program will continue until it is finished, which, if you have entered a large number of luminaires, may take some time, depending on the computer. The program will inform you how far it has progressed in the calculations by printing a percentage-completed bar.
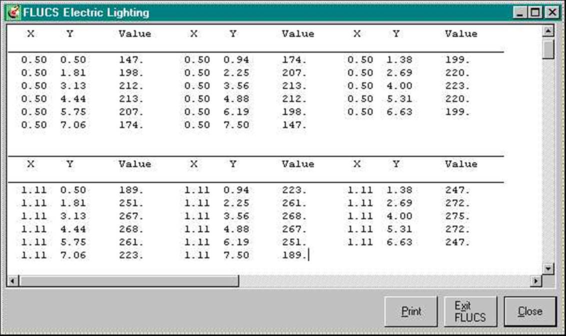
Once the program has finished doing the electric-lighting calculations, you will be presented with a menu from which you can select: a summary of the results, a table showing the illumination levels at the grid points, the option to set the contour levels for the isolux plot and to view the isolux plot.
If you choose to set the contour levels, the program will present you with the maximum and minimum illumination values as well as the minimum contour step size and prompt you to enter values for the first contour value and the contour step size, with suggested values which you may change if you wish. Alternatively you can specify up to 16 individual contour values, which must be entered in order of increasing illumination level.
If you choose to view the isolux plot the program will plot an isolux contour map on the screen using the contour values just set.
Daylighting Calculations
Selecting this option will cause the program to calculate the daylight level on the working plane, due to each window. The program will inform you how far it in the calculations by printing a percentage-completed bar. The technique used is in accordance with the BRS Split-Flux method and assumes that the sky luminance is that of the CIE standard overcast sky. Inter-reflections & internal obstructions are taken into account.
Once the program has finished doing the daylighting calculations, you will be presented with a menu from which you can select: a summary of the results, a table showing the daylight factor levels at the grid points, the option to set the contour levels for the isolux plot and to view the isolux plot.
The program assumes predefined contour values, which are equivalent to the set values. However, if you wish to override these, the program will present you with the maximum and minimum daylight values as well as the minimum contour step size and prompt you to enter your own contour values in a similar manner to that described for the electric-lighting calculations above.
If you choose to view the isolux plot the program will plot an isolux contour map on the screen using the contour values just set.
Output
When you select Output File from the Review menu you can view and print the contents of the output file. This may include results from:
· Database Calculations
· Design Calculations
· Point-by-Point Analysis Calculations
Within the analysis calculations, output can be created from the Calculations Review/Output menu which appears after the calculations have been performed. For all calculations you can select a table showing the illumination levels at grid points on the working plane, or isolux plots. If you select an isolux plot you will be asked what size paper you wish the plot to be scaled to.
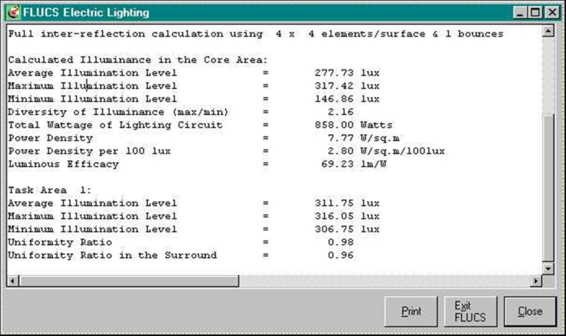
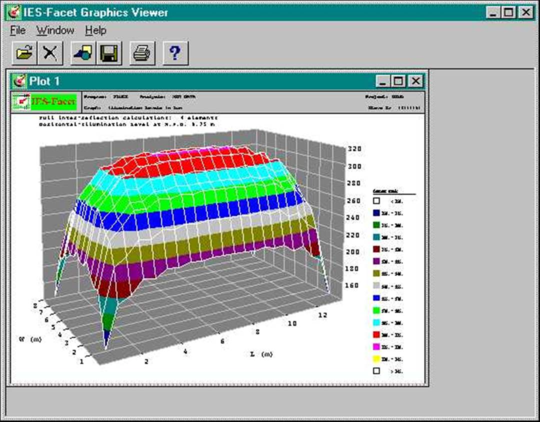
Full Inter-Reflection Calculations
The inter-reflected component will be calculated in all cases where surface reflectances are greater than zero, although the accuracy and the computer calculation time will depend on whether the full or simplified calculations are requested.
The full inter-reflection calculations are very computationally intensive and involve dividing each room surface into a number of elements that you specify. Direct illumination on each element is calculated, taking into account any obstructions from internal partitions or boxes. The reflection of light from each element is assumed to be totally diffuse. The light from each successive reflection is then considered, again taking into account obstructions. Because of the inverse-square law that applies to light intensity, the light from successive bounces rapidly diminishes. The calculation time is nonetheless considerably longer than that for the simplified calculation, which calculates the total amount of reflected light & distributes it evenly around the room. However, a useful by-product of the inter-reflective calculation method is that lux values are calculated (& may be displayed) for all the reflecting surfaces, i.e. the walls, ceiling, floor & partitions.
In many situations the full inter-reflection calculations are not essential, for example if you are assessing a design in its preliminary stages or if the inter-reflected component is going to be small in comparison with the direct component as with a large array of recessed downlighters. However, to obtain accurate results for uplighter installations, the full calculations must be used, since the reflected component will account for most, if not all, of the light falling on the horizontal working plane.
Number of Surface Elements
This determines the accuracy (and the calculation time) of the full inter-reflection calculations by specifying the manner in which each room surface is divided.
You are asked to enter a number between 4 and 20, specifying the number of elements in each axis of the surface plane. Thus if you enter 4 elements then each surface will be divided into 4 x 4 = 16 elements.
The number of elements required will depend on the size of the space in question and the type of luminaires being used.
Note the default value of 4 for the number of surface elements will give a reasonable calculation time (seconds or minutes). A fourth-power law relates the value of this item to the calculation time, e.g. doubling its value increases the run time by a factor of 16.
Edit Database
This will allow you to edit, copy or delete items from the luminaire, lamp or LLMF curve databases. Select Edit Database from the Database option in the top-bar menu. There are nine main options:
1. Edit Luminaire Data
2. Edit Lamp Data
3. Edit LLMF Curve
4. Copy Luminaire
5. Copy Lamp
6. Copy LLMF Curve
7. Delete Luminaire
8. Delete Lamp
9. Delete LLMF Curve
All options prompt you to enter the name of the item (luminaire, lamp, or LLMF curve) to be edited, copied, or deleted, subject to the following restrictions:
· You may EDIT any item in either the system or the user database. This is because the result of the edit is always stored in the user database, so the system database is protected.
· You may COPY any item FROM any database, i.e. the system database and the user databases in your project area and in other project areas. This is because the result of the copy is always stored in the user database, so the system database is protected. (Privileged users may also COPY items TO any database.)
· You may DELETE items from the USER database only. (Privileged users may DELETE items in the system database.)
Then the action is different for each option:
· The Edit option creates a dialogue box from the data held for the item in the database allowing you to modify it. If there are no errors the edited data will be saved in the user database, except that if an item of the same name already exists in the user database you will be asked if you wish to overwrite it. If there are errors or warnings you may use the menus to review them and re-edit the data.
· The Copy option asks you for a new name for the copy of the item. An existing name will not be allowed. If you want to copy to an existing item you must first delete this item. The item is then copied.
· The Delete option asks you if you are sure, and if so the item is deleted from the database.
Database Import and Export
Filenaming Conventions
Before reading in a lighting data file into the database, you must ensure that the filename ends in the DOS extension .CBS for a CIBSE format file, .ASC for an ASCII format file, or .IES for an IESNA format file. You may need to change the file extensions yourself, using the appropriate DOS commands.
Importing and Exporting Files
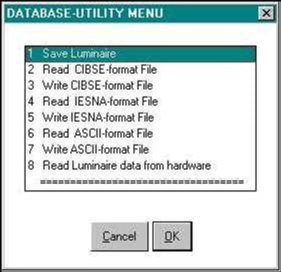
To import or export luminaire and lamp data into or out of the user database, select Database from the top-bar menu, then select Database Import and Export. You may then read or write CIBSE, IESNA or ASCII-format files.
Importing a File into the Database
To read in a file, select the appropriate format from the menu.
You will then be prompted to enter the name of the file in a standard Windows dialogue box. Select from the list of available files. You will be asked to confirm the luminaire reference name. Next, enter a two-letter code for the manufacturer.
You will then be asked if you wish to replace the valid-lamp reference with one from the lamps database. If you answer Yes, you must then select a lamp. The data will then have been read into the database.
Exporting a File from the Database
Select the appropriate format, and confirm that you want to write a file of that format. You will be prompted for where you wish to write the file.
Finally, you will be asked to confirm the reference names of the luminaires whose data you wish to include in the new file. The data will then have been written to the location you selected.