Editing HTM Opening Types
If you wish to modify the assigned louvres and windows after a room has been assigned to a unit group (or if the Automatically identify HTM® openings on room assignment setting was not active), there are three options available:
- Change opening types individually via drop-down menu on the view when the Monodraught HTM® grouping scheme is active.
- Change opening types individually via right-click menu in the room browser when the Monodraught HTM® grouping scheme is active.
- Change opening type for one or more selected openings simultaneously using the Opening Selection and Assignment functionality in ModelIT.
Changing Opening Type on the view
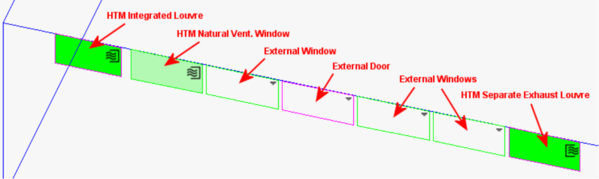
When a room is assigned to an HTM unit group and the Monodraught HTM® grouping scheme is active, an overlay will be displayed at the top-right of all external windows and doors in the room – when zoomed in sufficiently, this opening will indicate the type of opening using an icon (if the opening is used by the HTM unit(s) in the room) or a drop-arrow (if the opening is not used by the HTM unit(s) or the viewport zoom is insufficient to display the icon):

The icon or drop-arrow acts as a hotspot for the opening, allowing you to access a drop-menu to change its type whenever the standard Select tool is active (indicated by

on the toolbar) – the mouse cursor will change when over the hotspot ( ) to indicate that a menu can be displayed. You can then either left or right click on the hotspot to display the menu:
In the drop-menu, the current type of the opening is indicated in bold – you can select one of the other options to set the opening to function as that type. Note that if External Door/External Window is selected, the opening will no longer be associated with the HTM unit(s) in the room and its previous MacroFlo opening type (and construction, in the case of doors) will be restored (see Opening Type Updates for details).
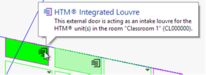
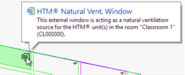
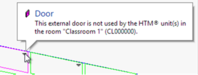
Note that you can also display a balloon tip containing information on the opening and its type by hovering over its hotspot with the mouse cursor (rather than clicking):
As with the drop-menu, the balloon tip is only displayed when the Select tool (

) is active.
Changing Opening Type using the browser
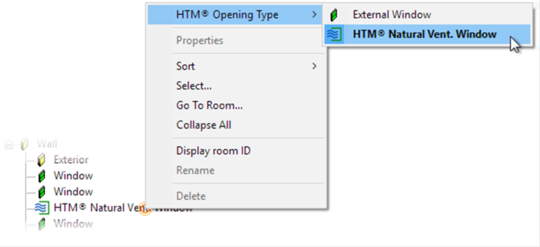
When the Monodraught HTM® grouping scheme is active, you can also use the browser’s right-click context menu to change the type of an opening. If you right-click on a wall-based external window or door item in the browser (note that you don’t have to left-click it first to select it), an additional HTM® Opening Type sub-menu will be displayed – this offers the same options as the hotspot drop-menu on the view for the opening:
As before, the current type of the opening is indicated in bold – you can select one of the other options to set the opening to function as that type. Note that if External Door/External Window is selected, the opening will no longer be associated with the HTM unit(s) in the room and its previous MacroFlo opening type (and construction, in the case of doors) will be restored.
The HTM® Opening Type sub-menu will not be displayed if you have right-clicked on an item that is not an external door/window, or if you have right-clicked on an external door/window in a room that is not assigned to an HTM unit group.
Changing Opening Type using Opening Selection and Assignment
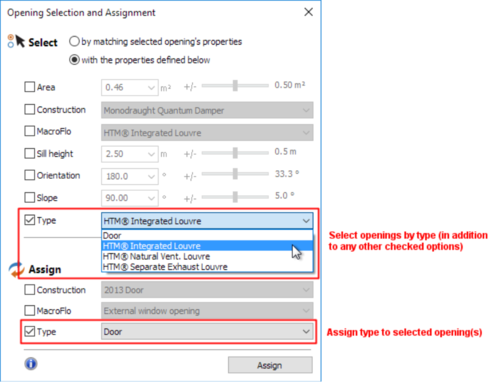
The Opening Selection and Assignment functionality in ModelIT has been extended to allow it to additionally select by type and assign type to openings. This method allows you to quickly select openings by their type (in addition to other settings such as area, sill height and orientation), as well as quickly set the type for selected openings.
The Opening Selection and Assignment utility operates on external windows or external doors – it cannot select and apply across both types simultaneously, nor can it act upon internal openings. Before using it for a particular type, you can select an opening manually on the view to ensure the utility is in the correct mode (e.g. to select/assign to doors, click on a door in the view first).
|
Note: The Type options for select and assign will only be displayed if at least one room is assigned to an HTM unit group. If you have changed the room assignments whilst the utility is opened, you will need to close the Opening Selection and Assignment window and re-open it again in order to display the options.
|
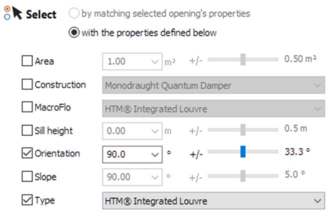
In the case of selection, you can use the Type option in combination with the existing options to fine-tune which opening(s) will be selected. For example, select all HTM Integrated Louvres at an orientation of 90°:
In the case of assignment for HTM types, you should avoid using it in combination with the MacroFlo option (and, in the case of louvres, the Construction). This is because assigning the HTM types will also update the MacroFlo/Construction assignments of the openings, thus cancelling out your selected choices.
If you attempt to assign an HTM type onto a window/door in a room that is not assigned to an HTM unit, the type will be left as a standard window/door.
Opening Type Updates
In order to accurately model the airflow characteristics of the HTM units for thermal simulation, modifications are made to the assigned MacroFlo opening type for the opening (and, in the case of doors, a custom Monodraught Quantum Damper construction is assigned). These modifications are performed on a copy of the MacroFlo opening type, as the original may be applied to other openings in the model that are not attached to HTM. However, if a suitable copy of the MacroFlo opening type already exists in the model, this one will be used instead to avoid bloating the opening type database.
The exact nature of the modifications to MacroFlo are dependent upon the type being set on the window/door. For HTM® Integrated Louvre, the following modifications are performed:
- The Opening Category is set to Louvre.
- The Openable Area % is set to 100.
- The Coeff. Discharge is set to 0.12.
- The Equivalent Orifice Area is recalculated.
- The Degree of Opening profile is set to HTM Exhaust and Intake Louvre - Yearly.
- The Description is set to HTM® Integrated Louvre (it may be optionally suffixed by a number, should multiple opening types exist with this name).
For HTM® Exhaust Louvre, the following modifications are performed:
- The Opening Category is set to Louvre.
- The Openable Area % is set to 100.
- The Coeff. Discharge is set to 0.15.
- The Equivalent Orifice Area is recalculated.
- The Degree of Opening profile is set to HTM Exhaust and Intake Louvre - Yearly.
- The Description is set to HTM® Exhaust Louvre (it may be optionally suffixed by a number, should multiple opening types exist with this name).
For HTM® Natural Vent. Louvre, the following modifications are performed:
- The Opening Category is set to Louvre.
- The Openable Area % is set to 100.
- The Coeff. Discharge is set to 0.15.
- The Equivalent Orifice Area is recalculated.
- The Degree of Opening profile is set to HTM Exhaust and Intake Louvre - Yearly.
- The Description is set to HTM® Natural Vent. Louvre (it may be optionally suffixed by a number, should multiple opening types exist with this name).
For HTM® Natural Vent. Window, the following modifications are performed:
- The Opening Category is set to Window – top hung.
- The Openable Area % is set to 95.
- The Max Angle Open ° is set to 20.
- The Equivalent Orifice Area is recalculated.
- The Degree of Opening profile is set to HTM Window - Yearly.
- The Description is set to HTM® Natural Vent. Window (it may be optionally suffixed by a number, should multiple opening types exist with this name).
All other settings in the created MacroFlo opening type should use the same values as their original source opening type.
When an opening is changed back to External Door or External Window (either manually using the options detailed in the previous section, or by assigning the room to the No HTM Assigned group), the assigned MacroFlo opening type will be reset to its original state (i.e. prior to setting the HTM type of the opening). If the original MacroFlo opening type is no longer available, the opening type specified by the room’s MacroFlo template will be used. In the case of external doors, the construction will also be set back to its original state – if the original construction is no longer available, the construction specified by the room’s Construction template will be used.
|
Note: HTM MacroFlo opening types are automatically removed when they are no longer required – you are therefore prevented from manually assigning them onto openings. This limitation also applies to HTM Profiles, as they are automatically removed if all HTM unit groups (i.e. all HTM components in the component library) are removed from the model. Whilst it is possible to edit the values of the HTM MacroFlo openings and profiles, this is not recommended as it may result in inaccurate HTM simulation results that do not reflect real-world performance of the units.
|