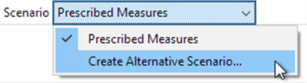
To create a new alternative scenario, first ensure the model is saved by selecting Save Project from the File menu or by clicking the button on the application toolbar. Then click on the Scenario drop-down menu in the VE Compliance regulations toolbar and select the Create Alternative Scenario… item:
This will then prompt you to enter a name for the scenario – you should enter something here that will allow you to easily identify the scenario. Note that the scenario name:
- Must be unique (case-insensitive)
- Cannot be blank (or consist of all spaces)
- Cannot contain any of the following characters: \ / : * ? " < > |
Click OK once you have entered a suitable name.
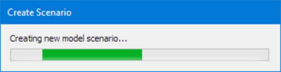
The existing model data is then copied to create the new scenario – depending on the size and complexity of your model, this may take some time.
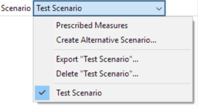
Once the scenario is created, it will automatically become the active model in Section 63 mode – its name will be displayed on the Scenario drop-down and in the caption of the main VE window. For example, if the scenario was called “Test Scenario”:
Any modifications made will then be applied to the scenario model.