Adding Doors, Windows & Holes
Add door
(“Edit” Þ “Add Opening” Þ “Door”)
Doors can be placed at any level of decomposition.
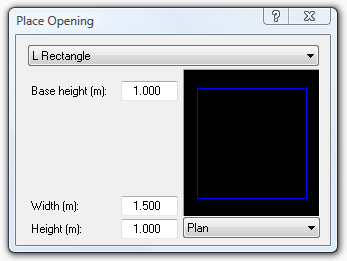
At model level when Add Door is selected the Add Opening dialog pops up:
This has pre-built openings that can be used to place any type of opening on any surface by entering Base Height, Width and Height then selecting the location on the surface where the opening is desired.
These openings are based on components within the CompLib component Modeller. Any new or existing component given the category Opening can be used as an opening in ModelIT.
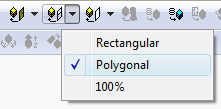
When the level of decomposition is at the Surface level there are 3 modes available, “Rectangular”, “Polygonal” or “100%”.
The default setting is to place rectangular doors. Place a door by entering a data point for one corner of the door and then drag a box to the diagonally opposite corner of the door. However, you can also place polygonal shaped doors by clicking on the small arrow button next to the “Add Door” button and selecting the “Polygonal” option. Complete the door by pressing the ‘C’ key on your keyboard. This command remains active allowing you to add multiple doors onto the same surface. For 100%, select the 100% opening option and click on the surface.
Note at the Surface level of decomposition, you are always looking from the inside of a space outwards.
Select the space at Model level and move down

to the Space level. Select the surface to which you want to add a door and move down

to the Surface level.
Key-In: In "Rectangular" mode: dx=<dx, dy> to select first and/or second corner (relative to the bottom left corner of the surface). In “Polygonal” mode: dx=<dx, dy> after first co-ordinate has been selected manually.
Add window
(“Edit” Þ “Add Opening” Þ “Window”)
This option operates identically to the "Add Door" option (see section 4.15).
Windows can be placed at any level of decomposition.
At model level when Add Window is selected the Add Opening dialog pops up (see section 4.15).
When the level of decomposition is at the Surface level there are 3 modes available, “Rectangular”, “Polygonal” or “100%” (see section 4.15).
The default setting is to place rectangular windows. Place a window by entering a data point for one corner of the window and then drag a box to the diagonally opposite corner of the window. However, you can also place polygonal shaped windows by clicking on the small arrow button next to the "Add Window" tool button and selecting the "Polygonal" option. Complete the window by pressing the ‘C’ key on your keyboard.
Key-In: As for "Add Door" see section 4.15.
Add hole
(“Edit” Þ “Add Opening” Þ “Hole”)
This option operates identically to the "Add Door" option (see section 4.15).
Holes can be placed at any level of decomposition.
At model level when Add Hole is selected the Add Opening dialog pops up (see section 4.15).
When the level of decomposition is at the Surface level there are 3 modes available, “Rectangular”, “Polygonal” or “100%” (see section 4.15).
This has the effect of retaining two separate spaces, but there is a hole (sometimes referred to as a superfices) in the connecting partition.
Key-In: As for "Add Door" see section 4.15.