Using the HTM Grouping Scheme
Once you have imported one or both of the unit components from the library, a new Monodraught HTM® room grouping scheme will be created in your model and automatically selected in the room browser pane (if the pane is not visible at the bottom left of the VE window, you can display it using the

button on the application toolbar, or by selecting Browser from the File->View menu).
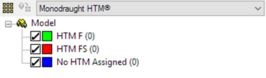
The HTM grouping scheme is the mechanism used to assign an HTM unit to a room in the model. The scheme contains one or more unit groups representing each unit type you have in your model – this will initially be the unit(s) you imported using the previous navigator action. There is also a final unit group called No HTM Assigned – if a room is not being served by an HTM unit, it is contained in this group (initially, all rooms in the model will be in this group).
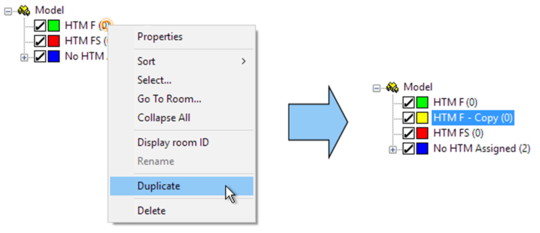
Duplicating Unit Groups
Since all rooms assigned to a particular unit group will share the same HTM properties (i.e. number of units in room, opening highlighting and so on), you may want to create one or more duplicates to allow the same basic type of unit (FS or F) to be used with different properties on each. To duplicate a group, right-click on it in the grouping scheme and select the Duplicate item – this will then create a new unit group below the right-clicked group that can be edited and assigned to independently.
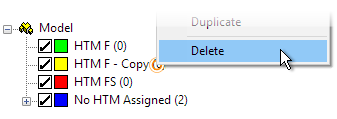
Deleting Unit Groups
If you have unit groups that are no longer required, you can remove them to avoid clutter. To remove a unit group, right-click on it in the grouping scheme and select the Delete item.
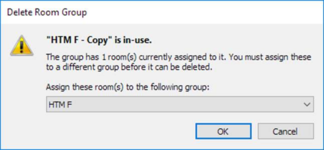
If there are one or more rooms currently assigned to the unit group, they will need to be re-assigned before the group can be deleted. The software will prompt you to do this before you can proceed:
Clicking Cancel at this point will mean that the unit group is not deleted and the room(s) remain assigned to it. Clicking OK will re-assign the room(s) to the alternative unit group and then remove the unit group.
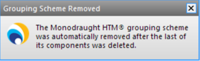
All unit groups can be deleted (excluding the No HTM Assigned group). Note that if the last “real” unit group is removed, the grouping scheme itself will be automatically removed and the following alert will be displayed:
The grouping scheme can be reinstated by importing one or both of the original components again.
Editing Unit Group Properties
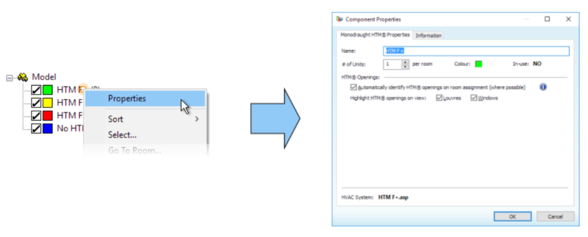
You can view and edit the HTM properties for each unit group (excluding the No HTM Assigned group) by right-clicking on the group item and selecting Properties. This will display the Component Properties window, consisting of two tabs: Monodraught HTM® Properties and Information.
The Monodraught HTM® Properties tab allows you to control the basics of the unit group such as naming, whether possible louvres and windows should be automatically identified when a room is assigned to the group, whether it will highlight its assigned louvres and windows, and its colour (displayed next to it in the grouping scheme and used by opening highlighting and if the By Room Group option is selected in the View->Colour menu).
Name: Allows you to change the name of the unit group. Editing this name will also update the name of the associated component in the model’s component library.
# of Units: Determines the number of simulated HTM units that will be used in each room that is assigned to the unit group. Note that each assigned room must have an integrated louvre for each simulated unit (e.g. if the # of Units is 2, each assigned room must have 2 integrated louvres). Refer to Appendix B: for details of required louvre sizes for HTM systems and ideal quantities of HTM systems for different room types.
Colour: Displays the colour currently used by the unit group for highlighting (this colour is displayed next to each group in the Monodraught HTM® grouping scheme). Clicking on the colour will display the standard colour picker window, allowing this colour to be changed.
In-use: Indicates whether the unit group is in-use (has one or more rooms assigned to it) or not in use.
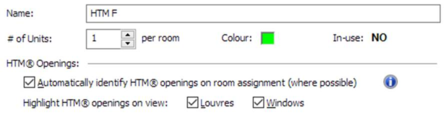
Automatically identify HTM® openings on room assignment (where possible): If active, the VE will attempt to automatically identify any wall-based external windows or doors that can be associated to the HTM units in the room at the point it is assigned to the unit group. Any external windows or doors in the room that are assigned a MacroFlo opening type that is not using the “off continuously” profile will be considered for use by the HTM unit and their MacroFlo updated appropriately.
For more details on assigning louvres and windows for HTM units, see the Assignment Guidance section.
 Highlight HTM® openings on view:
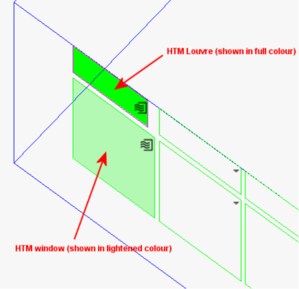
 These options control whether rooms assigned to this unit group will highlight their attached louvre(s) and/or window(s). Louvres will be highlighted in full colour, while windows will be highlighted in a lightened version of the colour. Note that the opening highlighting is only displayed if the Monodraught HTM® grouping scheme is active in the room browser.
IMPORTANT: switching off highlighting does not stop the openings from being used by the HTM units – it is simply a visual cue to provide at-a-glance identification of which openings in a room are used by the HTM in that room.
Note that if there are already room(s) assigned to the unit group when you apply changes to one or more of these settings, the updates will be applied to all currently assigned rooms.
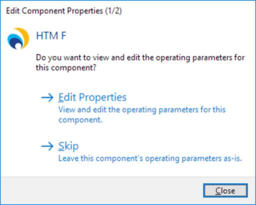
The navigator action Adjust HTM® operating parameters for the imported systems (as necessary) will simply cycle through all available unit groups, asking you whether you want to edit the properties or skip.
This is equivalent to right-clicking on each unit group in turn and clicking on Properties.