Figure 2 - Preliminary Data Setup Sub-Categories and Tasks
A few things to note that are consistent across all the sub tasks for each of the nine main category areas with the navigator
Figure 3 - Task Button Options
Each task line will have up to three buttons shown to the right:
- ? – provides a link to ‘help files’ directly related to that task line
- Notes icon – when selected a ‘notes field’ will appear below, which allows the user to input specific notes related to that task for documentation purposes or to share with other team members
- Check box – provides users the ability to select and ‘check’ that task as complete. This can be important for personal or team tracking on a large or complex project.
Workflow concept
The hyperlink serves a ‘help guide’ and takes the user to a more detailed description of the workflow concept for the navigator, similar to the information contained within this document.
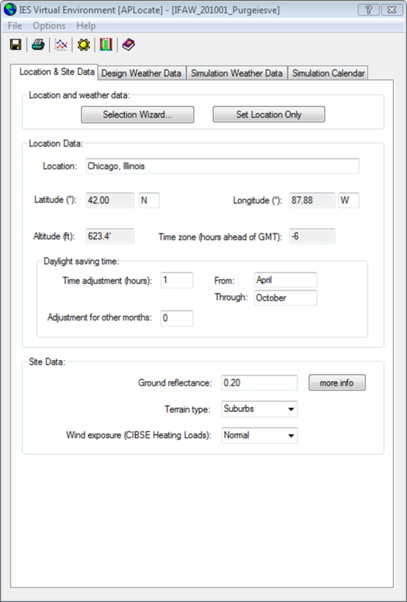
Site, Location and Climate
The hyperlink for this action opens the ApLocate sub-program from which the user then specifies the global location of the building (Lat.>Lon.), external design conditions and simulation weather file. This process is driven by clicking on the ‘Selection Wizard...’ and following the necessary steps:
Figure 4 - Location Selection
There are four tabs associated with this dialog box:
-
Location & Site Data – there are two options for selecting (Selection Wizard or Set Location Only) the climate file associated with the project.
Figure 5.1 - Location Selection Wizard
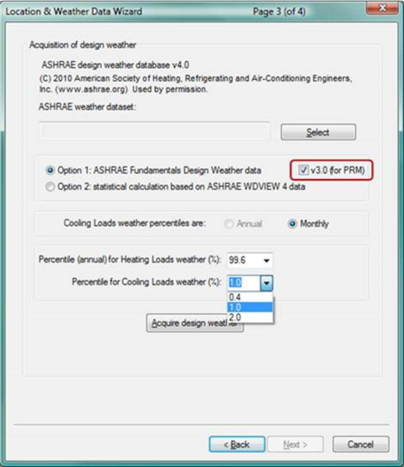
Important Note: As the ASHRE 90.1-2007 and -2010 Appendix G PRM (Section G3.1.2.2.1 Sizing Runs) requires 1% Cooling Design conditions, but the newer ASHRAE Design Weather Database 4.0 does not include 1% data, all PRM users need to tick the box next to “v3.0 for PRM” in the Acquisition of design weather section (page 3 of 4) in the ApLocate Location & Weather Data Wizard. Then set the Percentile for Cooling Loads to 1%, prior to clicking Acquire design weather.
-
Design Weather Data – provides feedback on the climate selected and the ability to review and customize key parameters of the climate selected. This data will be used for the Sizing Runs.
-
Simulation Weather Data – Reports the weather file that ApacheSim will be utilizing for simulation runs. The file is selected based on the choices within Location & Site Data/Selection Wizard, however the user can also change the selection within this tab to browse and select a different weather file. This data will be used for the annual thermal/energy simulations.
-
Simulation Calendar – provides the ability to select and customize ‘a holiday template’ (days considered to be holidays which could trigger different building operation setting) based on the country and other parameters.
Once the location is selected the climate file, which provides the input data for the hourly energy (8,760 hours) is determined. The VE actually runs the energy analysis on 6-minute time steps (as a default) versus hourly, so that the influence of thermal mass can be accounted for within the design.
Prototype Data (ASHRAE Baseline)
This command imports an ASHRAE 90.1 baseline data set which can then be used as a starting point for any PRM project. This is the most critical step in the PRM navigator as it essential gathers all the pre-created PRM information so that the navigator can function in its intended fashion. When the command is activated the software automatically imports a range of default ASHRAE data in a fully functional VE format, this information has been taken from 90.1 ASHRAE 90.1 & the ASHRAE 90.1 user guide. This allows a user to define the building based on the building type (for early stage analysis) or space type (for more detailed analysis):
· ASHRAE 90.1 Thermal Templates (Building Area Method or Space by Space Method)
For the Building Area Method, default data is derived from:
o ASHRAE 90.1 Internal Gains (Occupancy, Lighting, Equipment)
·
· For the Space by Space Method, default data is derived from:
o ASHRAE 90.1 Lighting power densities
o ASHRAE 62.1 Occupancy densities
o Title 24 ACM Equipment power densities
· Both methods use
o ASHRAE 90.1 Profiles/Schedules (from the User’s manual)
o ASHRAE 62.1 Outdoor fresh air rates
o ASHRAE 90.1 Envelope/Fabric Data (ASHRAE Climate Zone specific)
o ASHRAE 90.1 Baseline Systems (1 to 8 +)
All of these defaults are editable to suit your actual project through subsequent steps of the navigator.
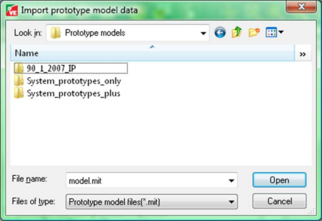
After the Navigator command has been activated the user must then select the “90_1_2007_IP” folder and subsequently select the associated VE .mit file.
Figure 6 - Prototype Data Templates
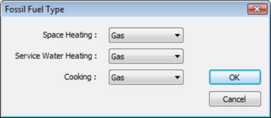
Fossil Fuel Type
All miscellaneous fuel codes are assumed to be electricity except for:
· Space Heating
· Service Water Heating
· Cooking
This command allows the user to select the appropriate fuel type per energy use which will be subsequently used in the automatic generation of PRM results reportage in the Results section of the Navigator. This step is only important if these energy end uses are served by fossil fuels. If they are served by electricity and assigned the appropriate fuel code, this step is not necessary.
Figure 7 - Fossil Fuel Type Dialog Box
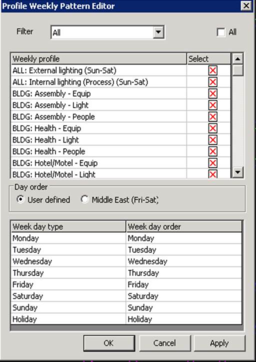
Update Profile Working Week Order
The hyperlink takes the user to the ‘Profile Weekly Pattern Editor’ which is used to dictate the daily operation of the building at a daily/weekly level. It allows the user to customize the operational days of their building to match the project requirements.
For example, in the Middle East region the typical working week is Sun-Thu with Fri/Sat being the weekend. In the UK/US however the working week is Mon-Fri with Sat/Sun being the weekend. This dialog allows the user to customise the weekly operation of their building.
An on/off filter is included which allows the weekday order re-shuffle/override to only be assigned to selected Profiles. The ‘All’ check-box allows a quick toggle to turn the entire list of profiles on/off.
Figure 8 - Profile Weekly Pattern Editor Dialog