The new video recording functionality allows video to be recorded in real-time. This means the user can move about freely while the video capture is going on in the background. Various output formats are supported. Below is a brief guide to using the video recording functionality.
Setup
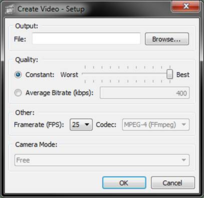
Upon clicking the ‘Record Video’ button in the Movie toolbar the user will be presented with the Setup window (see above). This allows the user to set the output destination and format. The supported formats are as follows: avi, mpg, mp4 and wmv. The user can then select the video’s output quality by using one of two options: Constant Quality (VBR) or Average Bitrate (CBR). After that the user can select the rate at which the video is recorded and played back. Using the default quality and frame rate settings is recommended.
Note: Changing the video codec used is currently unsupported.
Recording
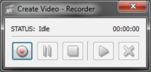
Once the user clicks OK in the Setup window they will be presented with the Recorder dialog.
This allows the user to start, pause and stop recording video. Once a video has been recorded the user can playback the video and/or delete the video. If the user deletes the video they can start a new recording using the previously specified settings. The record a new video with different settings the user should close the Recorder window and go through the previously mentioned steps.
Camera Path Usage
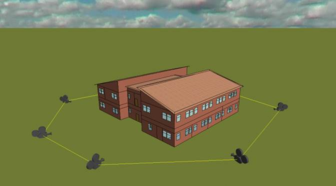
As with the old viewer, the new viewer allows the user to create camera paths to produce animations and video recordings. The new camera path interface has been simplified to allow the user to create paths easier and faster.
General
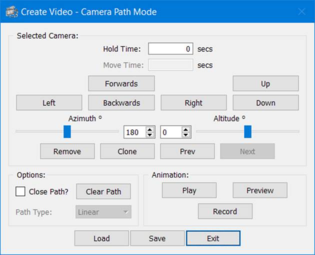
When the user clicks on the ‘Camera path’ button in the Movie toolbar they will be presented with the window above. From there, they can either load a previously designed camera path or create a new one from scratch. Unlike the old camera path feature the new one allows the user to place cameras using a ‘point and click’ method. From there the user can manipulate the camera’s position, orientation, and animation settings while using the ‘preview’ window to view the scene as the camera does. When happy with the camera path the user can preview the animation using a variety of methods and finally, if desired, record a video of the animation. For a list of keyboard and mouse controls on manipulating the camera path click
here .
Selected Camera
To select a camera the user should Ctrl + Left Click on the desired camera. The camera will be highlighted and the ‘preview’ window will appear in the top right of the view. The ‘preview’ window shows the scene exactly how the camera will at that point. In the camera path dialog the user is able to modify the number of seconds the animation will pause at the current position and how long it will take the camera to move to the next position if applicable. The user can also remove the camera or select the previous/next camera in the path. Using the keyboard/mouse controls the user can also modify the camera’s position/orientation as well as clone/remove the camera.
Options
From the camera path dialog the user can also choose to close the path using the ‘Close Path?’ option to create a loop. This will insert a segment between the last and first cameras in the path. It will also allow the user to specify a movement time between the two cameras.
The user can also clear the camera path using the ‘Clear path’ button and start again if they wish.
Note: Path type is not currently changeable.
Animation
The user can preview an animation of the path using one of two options.
The first option ‘Play’ will show the animation ‘full screen’ as it will be recorded.
The second option ‘Preview’ will show the animation in the ‘preview’ window and display a dummy camera in the main view showing the camera’s current position and orientation.
The user can then record the animation using the ‘Record’ button. This will present the user with the usual video setup dialog, then upon clicking OK will play and record the animation automatically. The user can then playback or delete the video as normal. When the Recorder window is closed the user will be returned to the camera path window. From there the user can create and record a new path if they wish or exit camera path mode.
Please note closed camera paths will only loop once when recording the animation.
Controls
Below is the list of controls mouse and keyboard controls used to create a camera path.
|
What
|
Control
|
Action
|
|
Select Camera
-or-
Add New Camera
|
Ctrl + LMB
|
Click
|
|
Select Camera
-or-
Clone Selected Camera
|
Ctrl + Shift + LMB
|
Click
|
|
Move Selected Camera on Plane
|
Shift + LMB
|
Click + Drag
|
|
Rotate Selected Camera Left/Right
|
Alt + LMB
|
Click + Drag
|
|
Deselect Camera
|
RMB
|
Click
|
|
Remove Selected Camera
|
Ctrl + RMB
|
Click
|
|
Adjust Selected Camera Height
|
Shift + RMB
|
Click + Drag
|
|
Rotate Selected Camera Up/Down
|
Alt + RMB
|
Click + Drag
|
|
Clear Camera Path
|
Ctrl + Shift + Alt + RMB
|
Click
|