Key-in and Edit Functions
Key-in Functions
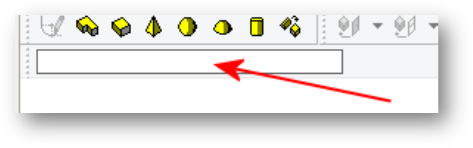
This allows you to enter commands or positional information using key-ins instead of the mouse.
Note: The Enter key must be pressed after typing a key-in.
By pressing the "Esc" key while in the key-in field a menu of a few basic commands is shown, selecting from this list will perform the appropriate function.
Pressing the “Esc” key again or selecting the “cancel” option will close the list.
Undo
("Edit" Þ "Undo")
Use this command to reverse the last action.
Redo
("Edit" Þ "Redo")
Use this command to reverse an "Undo" action.
Select Object
("View" Þ "Select Object")
Various controls require object selection before they can be used, e.g. copying or rotating spaces. ModelIT supports both multiple and single object selection. To select a single object, click on the "Select Object" button in the Edit toolbar, move the mouse so that the cursor is over the object to be selected and then click the left mouse button (without dragging the cursor).
Another method of space selection is to use the Model Browser. By default the Model Browser is to the left of the ModelIT workspace, although it can be moved or hidden (see the Virtual Environment Framework document for more details). Single spaces can be selected by clicking on the space to highlight it. There are two methods of multiple selections. The first method involves holding down the <CTRL> key on your keyboard while repeatedly selecting single objects in the model view or in the Model Browser. The second method is similar to single object selection except that after pressing the mouse button to select an object, you keep the mouse button pressed and drag the cursor across the objects to be selected.
You will also notice that various buttons on the Edit toolbar, which were formerly inactive, become active. This is because the controls associated with these tool buttons require space selection before they can be used.
In order to de-select objects, choose the “Select Object” button. Move the mouse so the cursor is in the active model window and click the right mouse button.
Measure Length
(“Edit” Þ “Measure” Þ “Length”)
This command allows you to measure the distance between two points. The distance in metres will be shown in the "Key-in" field in the edit toolbar.
Measure Angle
(“Edit” Þ “Measure” Þ “Angle”)
This command allows you to measure the angle between two points. The angle will be shown in the "Key-in" field in the edit toolbar.
Query Co-ordinates
(“Edit” Þ ”Query”)
This button is only active at the Model level; it highlights the point nearest to the cursor and displays the x, y, z co-ordinates in the "Co-ordinate" field in the view toolbar. In this mode the dynamic display of the cursor location is switched off.
Copy
(“Edit” Þ ”Selection Set” Þ “Copy”)
Use this command to copy the selected objects in any 2D view. Once the object(s) are selected, click and hold the left mouse button and drag the object(s) to the new position in the active view. The copy will then be completed, provided there are no intersection errors. Absolute and relative coordinates may be keyed in to copy spaces.
Note if you want to use a vertex as the handle point for copying a group, you must press the mouse button when the cursor is close to the vertex (zoom in if necessary). Otherwise the handle point will be the actual model space point selected, even if there is no object at that point.
Key-In: dx=<dx, dy>
Move
(“Edit” Þ ”Selection Set” Þ “Move”)
Use this command to move the selected objects in any 2D view. Once the object(s) are selected, click and hold the left mouse button to drag the object(s) to the new position in the active view. The move will then be completed, provided there are no intersection errors.
Key-In: dx=<dx, dy>
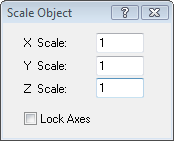
Scale
(“Edit” Þ ”Selection Set” Þ “Scale”)
Use this command to scale the selected objects in any 2D view. The "Scale Object" dialogue box will appear, in which you can enter the scale factors for the x, y and z axes.
The "Lock Axes" check box is used to lock all three axes to the same scale factor. Next, click on one of the handle points of the selected objects to carry out the scaling operation.
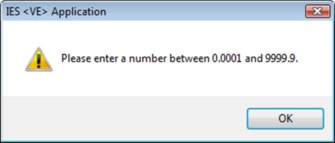
The scaling limits are set at 0.0001 to 9999.9; any values entered out with this range will give the following warning:
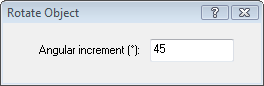
Rotate
(“Edit” Þ ”Selection Set” Þ “Rotate”)
Use this command to rotate the selected objects in any 2D view. The "Rotate Object" dialogue box will appear. Enter the angular increments by which you wish to rotate the selected objects.
Now as you move the cursor around the defined axis point, you will see the objects rotating by increments dictated by the "Angular Increment" setting in the "Rotate Object" dialogue box. Click the left mouse button when you have the required rotation, and the rotation will be completed.
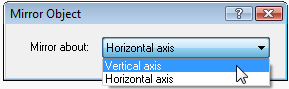
Mirror
(“Edit” Þ ”Selection Set” Þ “Mirror”)
Use this command to create a mirror copy of the selected objects in any 2D view. The "Mirror Object" dialogue box will appear, in which you select the mirror axis – "Horizontal axis" or "Vertical axis".
Move the cursor so that it is close to a space vertex that you want to use as the handle point and then press the left mouse button. Keeping the button pressed, drag the mirror copy of selected spaces to the required location, and then release the mouse button. The mirror copy will then be completed.
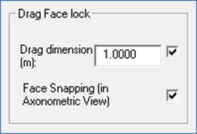
Drag Face
(“Edit” Þ ”Selection Set” Þ “Drag Face”)
Drag a selected face a desired amount. Use the lock menu to adjust default settings.
<
Draw partitions to divide the selected space
Select the zone you wish to create a partition and follow the instructions.
Connect Spaces
(“Edit”)
Spaces with complex shapes (e.g. a space with a dome shaped rooflight) are most conveniently built from more primitive spaces which are then connected using the "Connect Spaces" facility.
Select one of the spaces and then select the "Connect Spaces" option. The following dialogue box will then appear:
Select the space you wish to connect to by selecting it in the view or the Model Browser. The name of this second space will appear in the "Add Spaces" section of the dialogue box.
Before you connect the spaces you can decide if you wish the partitions between them to be removed or retained after connection, by selecting the required option from the drop down list in the Connect Spaces dialogue box. To connect the two spaces (i.e. to create a single composite space) click the "Add" button.
Separate Spaces
Edit selection set inner volume representation
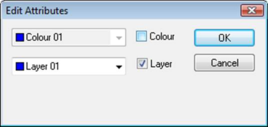
Edit Attributes
Use this command to edit the "Colour" and/or "Layer" of the selected space. Pops-up the following window:
ODO>: Insert description text here... And don't forget to add keyword for this topic