Glazed Construction - Layer Buttons
The following buttons, some of which are also available as context menu (right-click) options, are provided for tasks related to layer editing:
Copy: copies the properties of the selected layer (pane) to the clipboard. This is the same as Copy Layer on the context menu.
Paste: copies the material properties from the clipboard to the selected layer. The contents of the clipboard may have been copied from another layer, from a layer of a system construction or from a project or system material. This is the same as Paste Layer on the context menu.
Insert: inserts a layer adjacent to the selected layer on its outer side and assigns it the material properties stored in the clipboard. If the clipboard contains a construction layer, the new layer is also assigned the copied thickness. This is the same as Insert Layer on the context menu.
Add: adds a layer to the inside surface of the construction and assigns it the material properties stored in the clipboard. If the clipboard contains a construction layer, the new layer is also assigned the copied thickness. This is the same as Add Layer on the context menu.
Delete: deletes the selected pane and an adjacent air gap. If the pane is enclosed within the construction the deleted air gap will be the one to its inside. This is the same as Delete Layer on the context menu.
Flip: reverses the order of the panes and air gaps. There is no equivalent option on the context menu. Note that the order of the sub-layers within an Electrochromic Glazing layer will not be affected – these are always displayed as the Clear state followed by the Dark state.
Electrochromic: transforms the selected pane into an electrochromic pane (see below). A maximum of one electrochromic pane can exist in a given construction. When an electrochromic pane exists, the Electrochromic Control tab is made available.
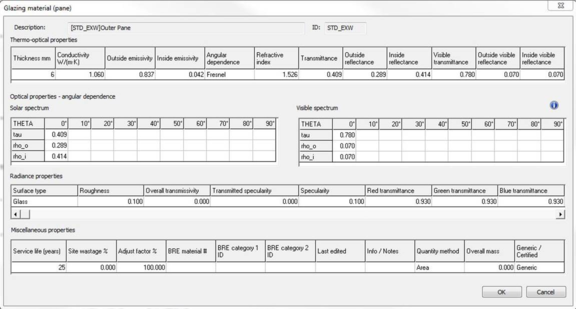
More Data…: opens the ’Glazing material (pane)’ dialog (see below)
Electrochromic button
This button converts the selected glazing layer to be an Electrochromic glazing layer, consisting of Clear and Dark sub-layers. This button will be disabled if the construction already contains an electrochromic layer, or a cavity (air gap) layer is selected.
When the Electrochromic button is clicked, the Electrochromic Glazing tab is automatically selected and the previously selected layer material is used for both the Clear and Dark state sub-layers. The standard Paste functionality can be used to change the material assigned on either of the sub-layers.
Materials buttons
System Materials: display the materials used in the system database, with the option of copying them into the construction. See System Materials for details.
Project Materials: display the materials in the project database, with the option of copying them into the construction. See Project Materials for details.
NB Library materials cannot be viewed from a button on this dialog.
Calculation buttons
Two further buttons perform analysis functions on the selected construction:
Condensation analysis: carries out an analysis of condensation risk for the construction under given temperature and humidity conditions. See Condensation Analysis for details.
Derived parameters: displays, in a separate window, a set of derived parameters for the selected construction. These include U-values and optical properties. The derived parameters will be dynamically updated as the construction is edited. See Derived Parameters for details.
OK/Cancel buttons
The glazed construction editing session is completed by clicking on either the OK or the Cancel button:
OK: exits the glazed construction dialog and keeps any changes.
Cancel: exits the glazed construction dialog and discards any changes.
More Data… button
When the button ‘More Data…’ is clicked the dialog in Fig 11 appears, displaying data for the selected layer. These variables include those which appear in the ‘Glazed construction’ dialog.
Figure 11 Glazing material (pane) with the relative angular values