Dialogue Boxes and Property Sheets
The dialogue boxes and property sheets in the lighting database, and the items shown on them, are explained in this section.
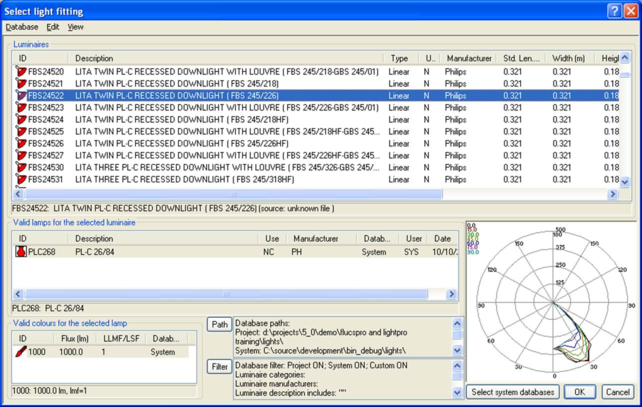
Select Light Fitting Dialogue Box
This dialogue box allows you to select a luminaire, lamp, and colour from three list views. When a luminaire is selected, the list of lamps is automatically updated to show lamps that are valid for the luminaire, and the polar curve is displayed. Similarly, when a lamp is selected, the list of colours is automatically updated to show colours that are valid for the lamp. The column headers may be clicked to sort on the property listed in that column. Menus are provided for database activities (database path and filters commands, saving the database, importing and exporting CIBSE, EULUMDAT or IESNA data, etc.) editing activities (add, properties, delete, database calculations) and changing the list view types.
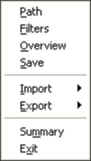
Database Menu
This menu (identical to the one in the Review database dialogue box) allows you to select an option for editing the database path and filters:
Path - Allows you to set the list of custom folder paths where lighting database files are to be accessed. This allows you to access lighting data from different parts of your network in addition to the system data and the data within your own project folder. The Database path dialogue box will open allowing you to browse for and add folders, or to remove folders, from the list of paths.
Filters - Allows you to set the filters that affect what elements of the lighting database are to be displayed in the light fitting selection or lighting database review dialogue boxes (NB filters only affect the display - the program may still access all the data). The Filters dialogue box opens, allowing you to enter filters based on type and manufacturer categories, and on whether the data is from the system folder, the custom folders, or the local project folder.
Overview – Shows the Overview dialogue box that displays a graphical overview of the relationships between the database tables.
Save - Save the database to file, with any changes. Note any items that have been changed are ALWAYS saved to your project folder, even if that is not where they were originally held. Since the project folder is the only place where the database is ever saved, the original items may still be present in the system or custom folders. However, this is not a problem, since the project folder is always searched first.
Database import - Allows access to the database import options.
CIBSE - Allows you to import CIBSE/1 or CIBSE/2 format luminaire data files into the database. The import dialogue box is displayed with a single page, the General import page.
EULUMDAT - Allows you to import EULUMDAT (European Luminaire Data) format luminaire data files into the database. The import dialogue box is displayed with a single page, the General import page.
IESNA - Allows you to import IESNA format luminaire data files into the database. The import dialogue box is displayed with two pages, the General import page and the IESNA import page.
Database export - Allows access to the database export options.
CIBSE - Allows you to export CIBSE/1 or CIBSE/2 format luminaire data files from the database.
EULUMDAT - Allows you to export EULUMDAT (European Luminaire Data) format luminaire data files from the database.
IESNA - Allows you to export IESNA format luminaire data files from the database.
Summary - Opens the Database summary dialogue box.
Exit - Close the dialogue box.
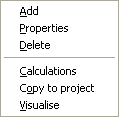
Edit Menu
This menu (not quite identical to the one in the Review database dialogue box) allows you to select an option for editing the database:
Add - Allows you to add an item to the database. A copy of the currently selected item is made and you are then allowed to edit it before saving it. The item being added depends on the last list you clicked.
Properties - Edit the currently selected item.
Delete - Allows you to delete the currently selected item.
Calculations - Allows you to perform database calculations on the currently-selected luminaire. Displays the Database calculations dialogue box (NB only for luminaires).
Copy to project – Copies the selected items from whatever source (Custom or System) to the Project database.
Visualise – use a window like the Model Viewer to see the photometric web generated by the polar curves.
Note the currently selected item is the item selected in whichever of the three list view panes last had the keyboard focus, i.e. was the last one where you clicked with the mouse or navigated to with the tab or cursor keys.
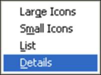
View Menu
This menu (identical to the one in the Review database dialogue box) allows you to change the type of view for the database lists. The option you choose will be applied to the last list that you clicked in. The 4 options are the same as in Windows Explorer - you may change between large and small icon views, list view or report view:
Large icons - Select this option to display large icons in the list view.
Small icons - Select this option to display small icons in the list view.
List - Select this option to display each item on a new line in the list view.
Details - Select this option to display full details of each item on a new line in the list view. Click the column headers to sort the list by the item referred to by the column.
List View Panes
These three list view panes show the currently selected luminaire, valid lamp and colour. Selecting any item and selecting the edit menu option, or simply double-clicking the item, causes the item’s property sheet to be displayed for review and editing.
Luminaire Label
Shows the selected luminaire.
Lamp Label
Shows the selected valid lamp.
Colour Label
Shows the selected lamp colour.
Path Button
This provides a shortcut to the Database > Path menu option. Selected options are shown in the edit box alongside.
Filter Button
This provides a shortcut to the Database > Filter menu option. Selected options are shown in the edit box alongside.
Select System Databases Button
This allows you to select which system databases to load. Displays the Select System Databases dialogue box.
Polar Curve Display
This shows the polar curves for the selected luminaire. Double-clicking on this plot has the same effect as using the Edit > Visualise menu option.