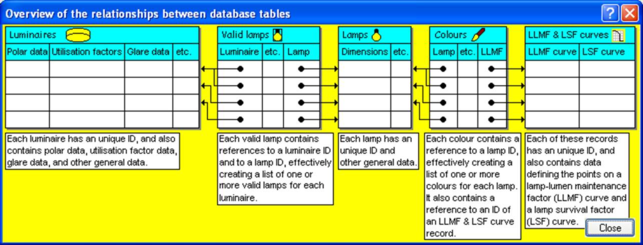
Overview Dialogue Box
This dialogue box shows you an overview of the relationship between the 5 tables used in the database. It is for information only.
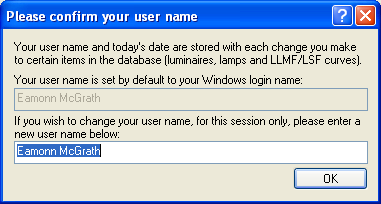
User Name Dialogue Box
This dialogue box asks you to confirm your user name before any changes are made to the database. It only appears once, the first time the user name is required, and then the same name will be used for any subsequent changes. The default name is based on your Windows login name.
Login ID
Displays the ID you used to login to Windows. This is used as a base for the default user name.
User Name
Enter your user name or accept the default suggested for you.
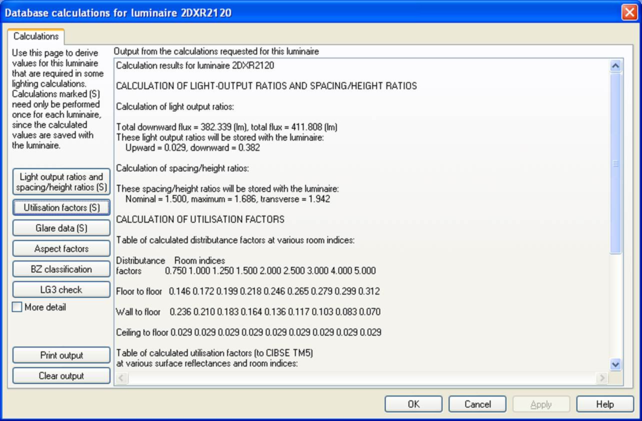
Database Calculations Dialogue Box
This dialogue box appears when you select the "Database" option from the context menu when a luminaire is selected and then select "Calculations". The buttons show the available calculations:
Light Output Ratios and Spacing/Height Ratios Button
This option is used to calculate the upward and downward light-output ratios (LORs) and the maximum, maximum transverse, and nominal spacing-to-height ratios (SHRs) for the given luminaire. The calculation method is based on the procedures in CIBSE TM5. Results are stored with the luminaire.
Utilisation Factors Button
This option calculates the standard utilisation factors for the nine given room indices (0.75 to 5) following the procedures given in CIBSE TM5. Results are stored with the luminaire.
Glare Data Button
The standard uncorrected glare indices for the nineteen standard room sizes of X and Y for reflection factors of 70 (ceiling), 50 (walls) and 20 (floor) are calculated. For each room size, values for endwise and crosswise viewing are given based on the procedures in CIBSE TM10. Results are stored with the luminaire.
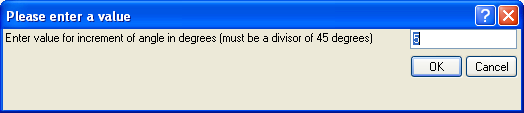
Aspect Factors Button
The parallel and perpendicular aspect factors for the luminaire are calculated at 5 degree intervals from 0 to 90 degrees.
BZ Classification Button
Not available at present
This option calculates the British Zonal (BZ) classification for the luminaire within the nine standard room indices (0.75 to 5).
LG3 Checks Button
This option checks that the luminaire selected meets the criterion for the design of downlighting, from the CIBSE Lighting Guide LG3, 'Areas for Visual Display Terminals', as amended in 2001. You will be asked to select the luminance limit for the luminaire and the limit elevation angle above which the luminance limit must not be exceeded.
More Detail Check Box
Select this option to get more control over, and more detailed output from, the calculations.
Allows you to turn on or off the parts of the calculations which request more input data from you or give more detailed output.
Print Output Button
Allows you to print the messages from the calculations.
Clear Output Button
Allows you to clear the messages from the calculations.
Results Area
Displays the results of the database calculations.
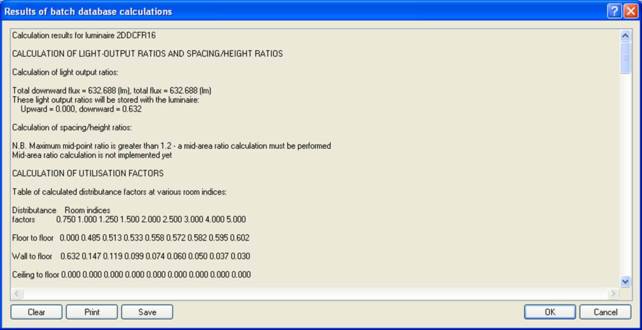
Batch Calculations Dialogue Box
This gives you important information about what the batch calculations will perform.
After the calculations the results are displayed in a Results dialogue box.
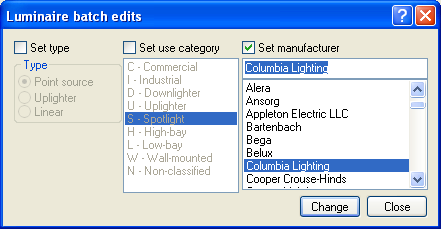
Batch Edits Dialogue Box
This allows you to override selected data on a global basis for all the selected luminaires.
Set Type Check Box
Select this if you want to set the type for all the selected luminaires, and then select an option below:
· Point source option - select this option to specify that the luminaire may be treated as a point source - i.e. has negligible area of light source.
· Uplighter option - select this option to specify that the luminaire may be treated as an uplighter, i.e. most of the light output is upwards.
· Linear option - select this option to specify that the luminaire may be treated as a linear luminaire, i.e. has an extended area of light source.
Set Use Category Check Box
Select this if you want to set the use category for all the selected luminaires, and then select a use category below.
Luminaire Use Categories List
Lists the luminaire use categories from which none, one, or more may be selected. The luminaire category is a form of classification, so that particular types of luminaire can be reviewed more easily. See Luminaire use categories for a list of available categories.
Set Manufacturer Check Box
Select this if you want to set the manufacturer for all the selected luminaires, and then enter or select a manufacturer below.
Luminaire Manufacturer
Enter a manufacturer name if it is not available in the list below.
Luminaire Manufacturers List
The manufacturer name is the second form of luminaire classification so that the review procedure can be used more easily. The manufacturer is represented by a descriptive name. See Luminaire manufacturers for a list of available names, but any additional name can be entered in the box above.
Import Dialogue Box
This property sheet is displayed when you import from external photometric data. It has one or two pages, depending on which format you are importing from:
· General import page
· IESNA import page
See http://www.helios32.com/Eulumdat.htm to view the specification of the EULUMDAT format provided by HELIOS32.
The IESNA and CIBSE formats are available from the respective bodies.
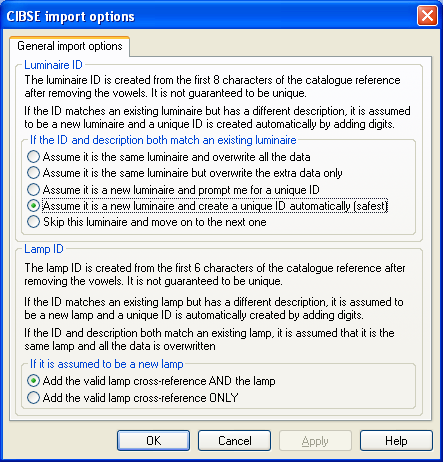
General Import Page
This property page allows you to control the process of importing luminaire data from external file formats.
The options allow you control over what happens if the luminaire name already exists, or if the lamp name does NOT already exist.
If the ID and Description Both Match an Existing Luminaire Option
Select the action you wish to take in this circumstance:
· Overwrite option - overwrite the luminaire if it already exists.
· Overwrite extra data option – if this option is selected, the polar data of the existing luminaire will be overwritten.
· Prompt for unique ID option - ask for a new luminaire ID if it already exists.
· Automatically generate unique ID option - automatically generate a new unique luminaire ID if it already exists. This works by appending numbers to the ID, starting with "0" and increasing until a unique ID is found (i.e. does not already exist in the database). It is the safest option, because a new ID will always be created. The downside of this is that the same luminaire may be stored in the database under more than one ID.
· Skip luminaire option – if this option is selected, the luminaire data will not be overwritten. The import file will continue to be read until another luminaire is found or the file has no more luminaire data.
If it is Assumed to be a New Lamp Option
Select the action you wish to take in this circumstance:
· Add valid lamp AND lamp option - if this option is selected, the relevant valid lamp will be created in the database, and ALSO the relevant lamp will be created.
· Add valid lamp ONLY option - if this option is selected, the relevant valid lamp will be created in the database, but the relevant lamp will NOT be created.
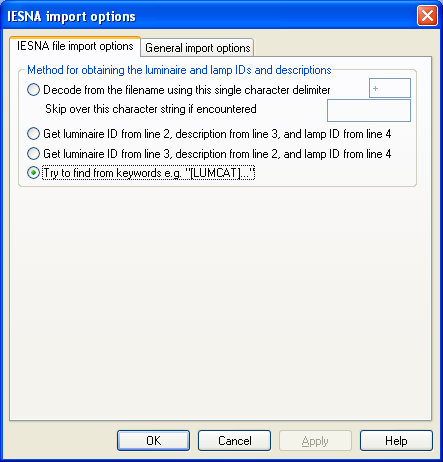
IESNA Import Page
This property page only appears when importing IESNA format luminaire data (Note IESNA = Illuminating Engineering Society of North America, NOT Integrated Environmental Solutions).
The page is fairly complex because of the degree of flexibility the IESNA format allows the manufacturers or photometric testers who produce the files. Some manufacturers use particular lines within the first 9 lines of the file to encode the luminaire and lamp catalogue reference and titles. Some use the keywords for encoding this information. Finally, some do not encode the information within the file at all, but instead encode it into the file NAME, using their own non-standard formats. In addition, there may be one luminaire per file or multiple luminaires per file.
Method for Obtaining the Luminaire and Lamp ID’s and Descriptions Option
Select the method that will be used to obtain these items from the file:
· Decode option - select this option if the luminaire and lamp ID's are encoded in the filename. If this option is selected you must enter data in the next two fields also:
o Delimiter - enter the character which the manufacturer or photometric tester used to separate the luminaire and lamp ID's encoded into the file name; e.g. for the ERCO file "ERCO_12408+T16_54W.IES", the luminaire is "12408", the lamp is "T16_54W", and the delimiter is "+".
o Ignore text - enter text which the manufacturer or photometric tester added to the file name which must be ignored; e.g. for the ERCO file "ERCO_12408+T16_54W.IES", the luminaire is "12408", the lamp is "T16_54W", and the ignore text is "ERCO_".
· Use line 2/3/4 option - select this option if the file contains the luminaire ID on line 2, the luminaire description on line 3, and the lamp description on line 4.
· Use line 3/2/4 option - select this option if the file contains the luminaire ID on line 3, the luminaire description on line 2, and the lamp description on line 4.
· Keywords option - select this option if the luminaire and lamp ID's and descriptions are encoded in the file using keywords such as "[LUMCAT]ABCD".
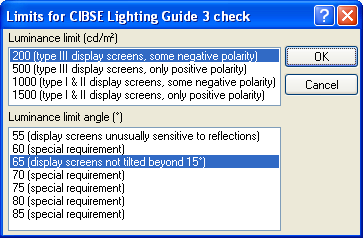
LG3 Dialogue Box
This dialogue box is displayed when you select the LG3 calculation.
The CIBSE Lighting Guide LG3:1996 "The visual environment for display screen use" specifies a test for assessing the potential for glare from a luminaire. A luminance limit is specified and a limiting angle to the vertical above which the luminance is checked. If the luminaire's luminance is below the limit at all angles below the limiting angle then the LG3 check is satisfactory.
Luminance Limit
Select the luminance limit to be checked above the specified limiting angle.
Limiting Angle
Select the angle to the vertical above which to check the luminance limit.
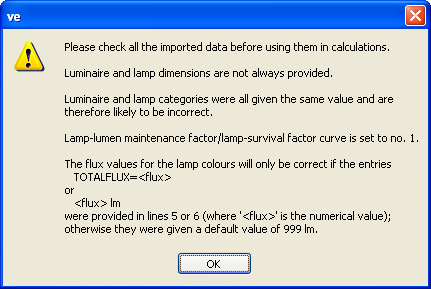
Import Summary Dialogue Box
This appears after importing photometric data. You should heed the warnings given, as the same categories must be applied to the whole batch of imports. Also bear in mind that the import process depends on the quality of the photometric data.
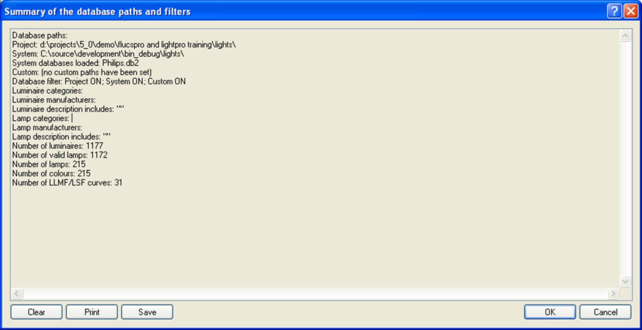
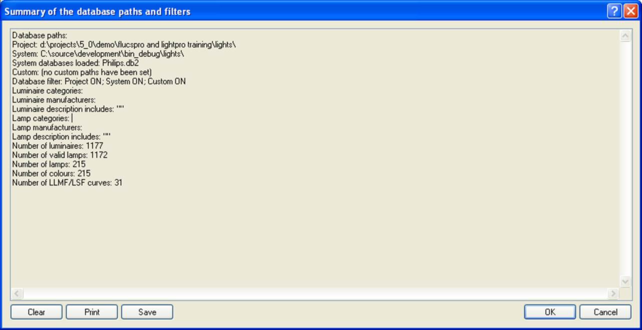
Database Summary Dialogue Box
This dialogue box gives you a brief summary of the location and contents of the lighting database, using a Results dialogue box.
Results Dialogue Box
This is a general purpose dialogue box that is used in different situations where a list of results is required.
Clear Button
Allows you to clear the summary.
Print Button
Allows you to print the summary.
Save Button
Allows you to save the summary to file.
Numeric Entry Dialogue Box
This dialogue box is used when the program requires you to enter any numeric value apart from the usual data entered via dialogue boxes or property pages.
Prompt
Displays the text describing the data input that is required.
Numeric Value
Enter the required numeric value here.
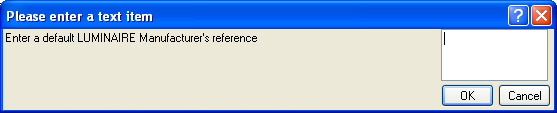
Text Entry Dialogue Box
This dialogue box is used when the program requires you to enter any text value apart from the usual data entered via dialogue boxes or property pages.
Prompt
Displays the text describing the data input that is required.
Text Value
Enter the required text value here.
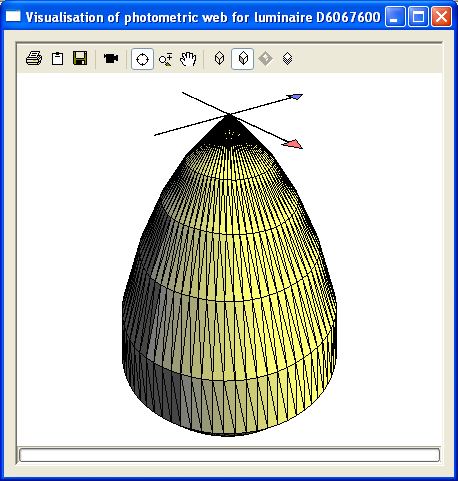
Visualisation of Photometric Web
This displays the photometric web generated by the polar curve data. It is useful for examining complex webs and for checking your edits. It is obtained by using the Visualise menu option, or by double-clicking the polar curve plot, on the Select light fitting dialogue box or on the Luminaire polar curve page. It uses the same 3d viewer control as the Model Viewer, so the buttons for navigation, movie-making etc. are the same. The only difference is that the ground plane is irrelevant here, so it is disabled. The x and y axes and the bounding rectangle of the luminaire are also displayed.