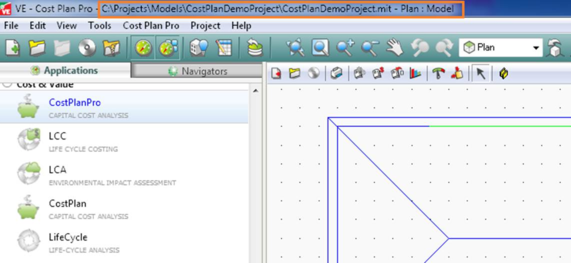
To launch the CostPlanPro module, choose CostPlanPro (Capital Cost Analysis) ) from the Applications tab in the main VE. You must have the appropriate license key to launch CostPlanPro.
Upon selecting the CostPlanPro module, a model tab is displayed on entry.
The user can create/import multiple cost plans for their project. Each cost plan will have a separate cost tab and project tab. Importing a cost plan from a previously completed project will be highly beneficial with respect to reducing the time required to set up a template from scratch.
All the opened cost plans will be loaded automatically into the view on next entry.
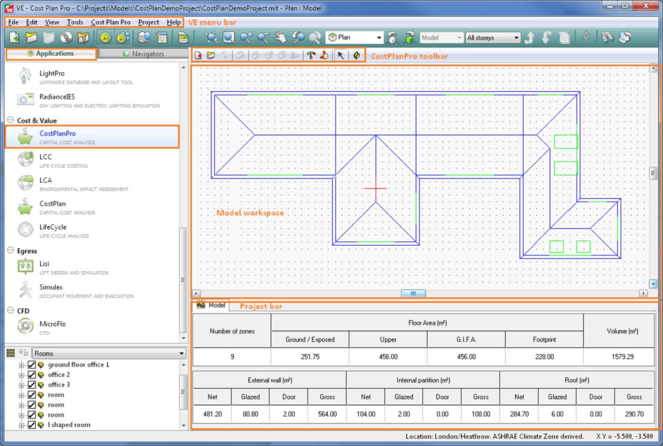
VE menu bar

…

These menu provides functions used throughout the Virtual Environment. Please refer to the
Virtual Environment User Guide for further information.
CostPlanPro menu bar
These pull-down menus provide functions specific to the CostPlanPro view.
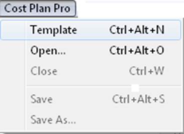
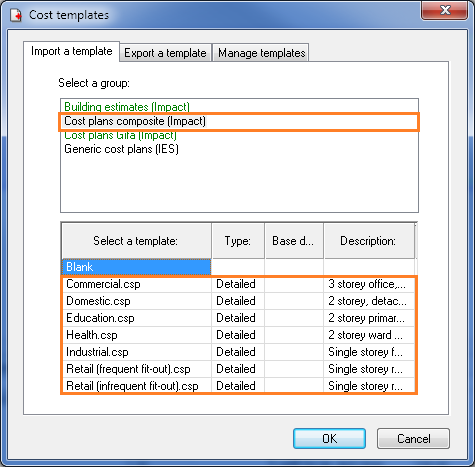
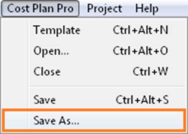
Click the item “Template” which will open the cost template dialog. You can then c reate a new, blank or copy existing template for this CostPlanPro project. (See 1.4.3.1 1.4.3.1 for details).
To open an existing cost template click “open”. The cost templates are saved as a .csp file. Selecting “close” will close the template dialog, click “save” to save the existing cost template or “save as” to save to a different location.
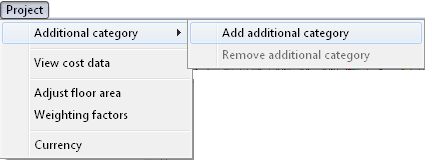
“Add additional category”: This is a legacy item inherited from the CostPlan module, which was intended to add a separate category to count for project level costs such as fees. Within the CostPlan Pro module, the user can choose to add categories more readily via the category section shown below. Here we can choose to “add” or “remove” categories.
However, should users want to use this item, it will generate an additional category as follows:
“Remove additional category” will remove the additional category.
“Adjust floor area”: Please refer to section 1.4.3.10 for details.
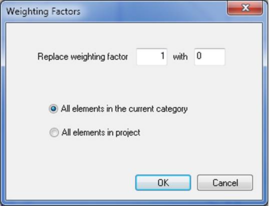
“Weighting factors”: This provides a mechanism to rapidly edit the weighting for all elements under the current category or for all elements in the project.
“Currency”: Please refer to section 1.4.6.6 for details.
CostPlanPro toolbar
The toolbars provide quick access to functions to manipulate the user interface and provide easy access to results.
Create a new file 
Create a new, blank or copy existing template for this CostPlanPro project. It is recommended that a user chooses an existing template.
Open an existing file 
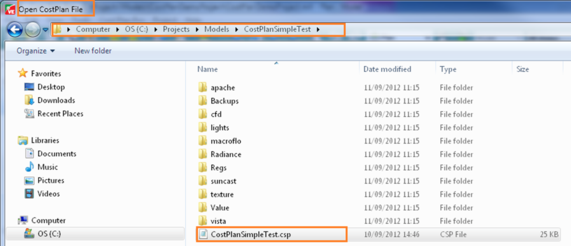
Open an existing csp file to use in this project. Please note if opening an existing csp file from an alternative VE project you must use save as to prevent overwriting the original csp file.
Example: note current project path is in a different location from the current project:
Once opened use File -> “Save As” to prevent overwriting original csp file:
This is currently logged as an issue to warn users of this issue prior to overnighting original project.
Save current file 
Save csp file to current location (Use CostPlanPro->Save As menu item to save to an alternate location or an alternative csp file).
Print data 
Print the current cost plan. Fields include id, description, code, rate, quantity, weight, base cost, cost, cost / GIFA, and TPI.
Bug: Currently LCC categories and elements will also be printed out. This has been logged into the known issues at the end of this document.
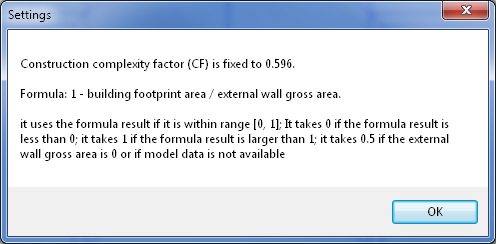
Settings 
This will display the construction complexity factor (CF) used for cost calculation – only used by element codes with CF in the description. For details on CF, please refer to section 1.2.1.1 .
Display CostPlan 
This will pop up a dialog to display a whole cost plan overview for cost assigned to the project. Users will have the option to use this dialog as a method of checking and editing values that have been used in the project. Any edits made in this view will be automatically updated in the cost plan for the project. The values can also be copied and pasted to Microsoft excel.
Copy and paste view 
This allows users to copy details of the selected cost plan into the current project.
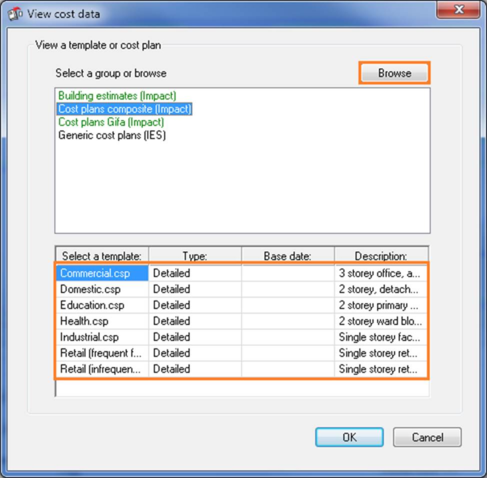
Clicking this button will bring up a dialog similar as the “Create a new file” toolbar button ( 1.4.3.1 ).
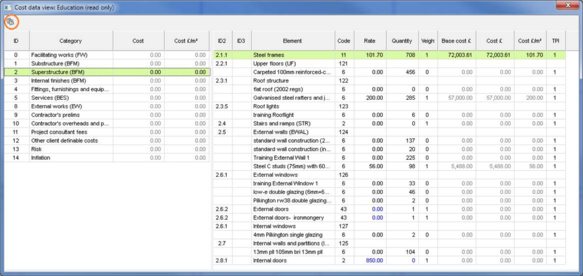
The user can either select a cost plan template, or click the “Browse” button to open any existing .csp file. Once the csp file has been selected, a modeless read-only dialog will display the selected cost plan file.
View charts 
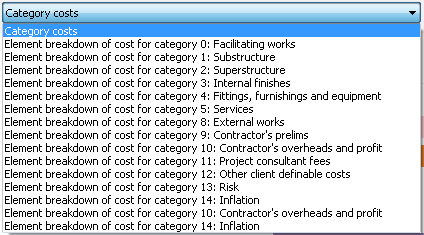
Category cost breakdown and element costs breakdown for each categories are available to copy to external applications.
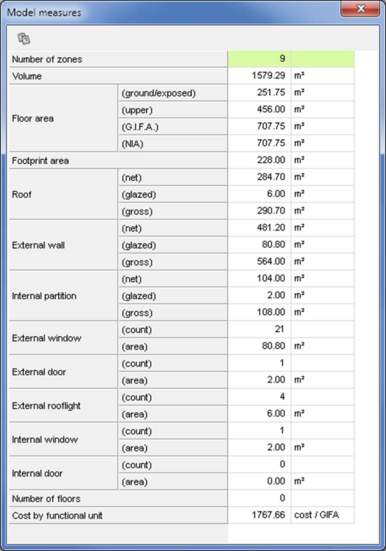
Model measures 
This provides a summary of the model information. The copy button on the top allows the data to be copied to external applications.
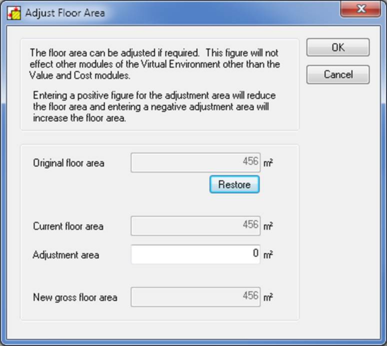
Adjust floor area 
This provides a facility for the user to adjust the GIFA without redrawing the model. Inputting a positive number reduces the GIFA and inputting a negative number increase the GIFA.
If the GIFA has been adjusted, a star sign will be added to the GIFA value on the Model tab.
Be cautious when using this facility. Only the quantity of the elements with element code “11 GIFA” will be changed by this dialog. All other areas will stay the same as the original model. However, if all elements are GIFA elements (elements with element code “11 GIFA” selected), then it can be a very useful tool to assess various building sizes of similar operation.
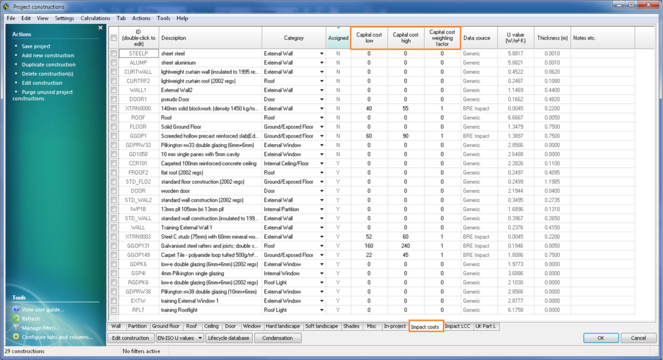
Apache construction database manager 
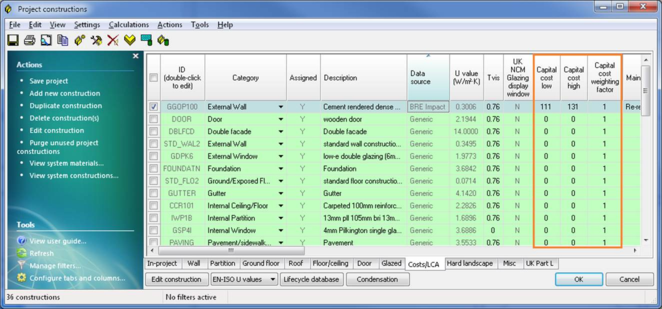
The Apache construction database manager (CDB) provides access to construction datasets and allows the user to edit or create constructions and materials. The high and low cost for each construction type can also be edited here. Once changes have been made and saved, the project will automatically update the capital cost with respect to any changes made by the user.
Model workspace
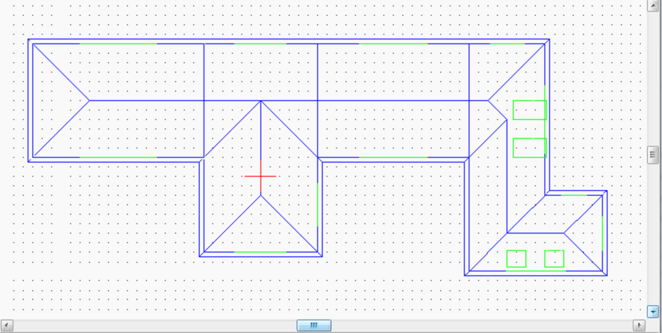
The model workspace displays the 3D model.
Project bar
Within each cost plan exists a model tab that displays relevant information specific to your current project. If there is no csp file created or imported, then only the model tab will be displayed as shown below.
Within the navigator, the user can select “Import cost template” or “create cost plan from scratch” which will display a dialog with options of selecting the relevant cost plan.
Rename the csp file and click “save”. The template had now been imported to your project.
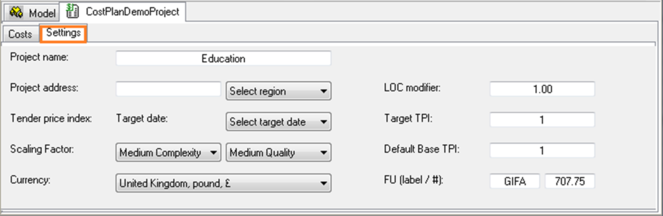
Project settings tab
The project settings tab contains the following information:
Project name
Editable field used to define the name of the project. This will not be the name assigned to the csp file.
Project address
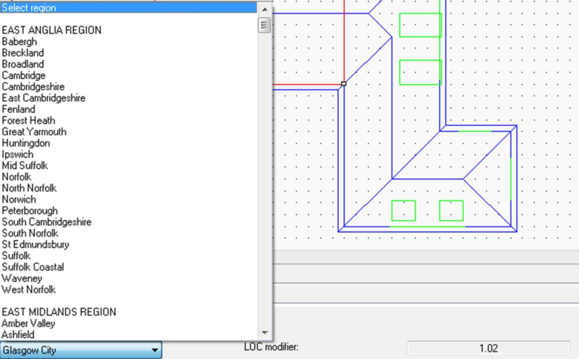
Here the user has the option to input the actual address for the project, bearing in mind that the project address entered by the user will have no effect on cost results or weather files. However the user can apply a location correction factor by selecting which region the building is located. This is achieved via the drop down menu to the right of the editable field. Depending on the project location, the software will use a LOC modifier (Location modifier) to correct project costs based on various locations.
If the region in which your project is located is not available for selection, the user will have the option of manually editing the LOC modifier to be used in the cost calculation.
For details on the location factor, please refer to section 1.2.2 .
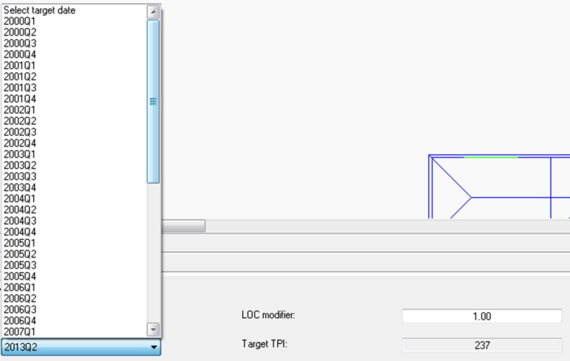
Tender price index
In order for the construction cost to be adjusted based on future start dates, a tender price index has been included. This will allow the user to adjust the actual cost of the project to reflect the cost when the project is due to start. Depending on which quarter and which year the project is targeted for, pre-defined correction factors have been provided and are available for selection via the Target TPI field. The target TPI is then used in conjunction with the base TPI to correct future construction costs.
If no defined target date is selected, the “Target TPI edit box will become editable and allows users to input their own target TPI.
For details on tender price index, please refer to section 1.2.3 .
Default base TPI
This is used to define the base TPI for all rates that are not provided with a pre-defined TPI.
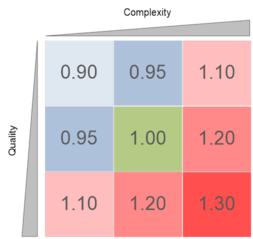
Scaling factor
This allows the user to adjust the overall construction cost at project level according to the complexity and quality of the project at hand. Three levels of complexity and quality are available which gives 9 combinations, each combination links to a factor in the following 3 by 3 metrics.
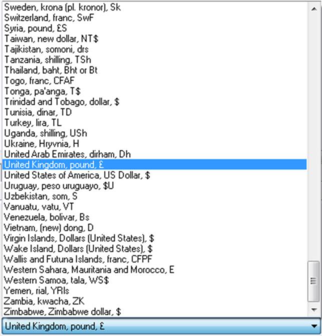
Currency
The currency combobox provides a list of countries and their currency. Selection of an item will lead to changes of the currency labels display in the cost plan headings. However, this will not lead to a conversion of costs and therefore will not change the rates and costs figure.
Functional unit
The user can define the functional unit string and the quantity.. It is used only in the Model measures dialog ( 1.4.3.9 ) to calculate a project cost per function unit.
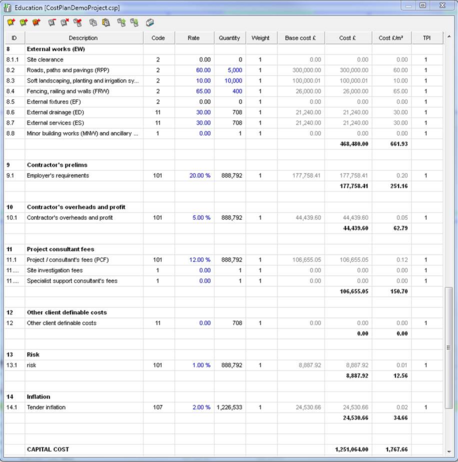
Costs tab
Within each cost plan exists a list of categories, which is then broken down into elements and subsequently sub-elements. The category list is displayed on the left and the element list is displayed in the right of the image below. The user can switch between each category which will result in the elements contained within the selected category being displayed in the element list to the right.
Category toolbar
The categories section toolbar is located beneath the grid:
 Add new category
 : add a new category to the end of the list.
 Cut category
 : delete currently selected category and place details on CostPlanPro clipboard (warning will appear prior to delete).
 Remove category:
 d elete currently selected category (warning will appear prior to delete).
 Insert category
 : insert a new category above currently selected category.
 Copy category
 : copy currently selected category to CostPlanPro clipboard. This will also copy all categories and elements to the windows clipboard to enable the user to paste to other applications such as excel.
 Paste category:
 paste category on clipboard over the currently selected category.
 Move category up
 : move currently selected category up by one row.
 Move category down
 : move currently selected category down by one row.
Categories grid columns
ID : User editable field.
Category : User editable field.
Cost : Total construction cost within this category.
Cost / m2 : cost / GIFA.
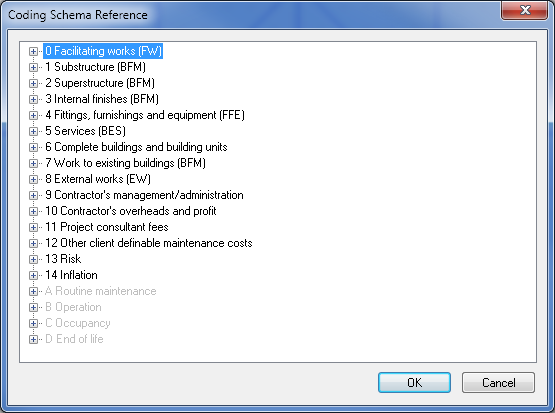
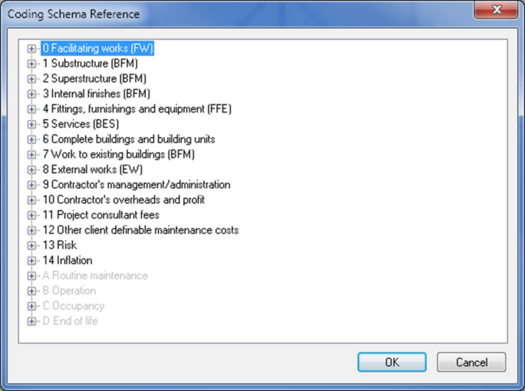
By right clicking the ID column of any category row will display the coding schema reference. For example:
This is a NRM based coding schema. Select any item in the above tree then click OK which will allow the id and name of the selected item pop into the id and name column of the currently selected category.
The greyed out items are not available for this module. They are used by LCC and LCA modules.
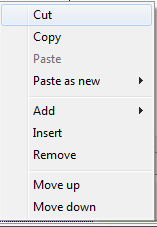
By right clicking any of the non-id columns of any category will display the context menu. For example:
Context menu:
Operations are similar to the category toolbar described above.
Cut : delete currently selected category and place details on clipboard (warning will appear prior to delete)
Copy : copy currently selected category to the CostPlanPro clipboard. This will also copy the all categories and elements to the windows clipboard to enable user to paste to other applications such as excel.
Paste : paste category on the CostPlanPro clipboard over the currently selected category.
Paste as new : Add a new category to the end of the list and paste category on the CostPlanPro clipboard into the new category. This option only exists in the context menu.
Add: add a new category to the end of the list.
Insert: insert a new category above currently selected category.
Remove : delete currently selected category (warning will appear prior to delete).
Move up : move currently selected category up by one row.
Move down : move currently selected category down by one row.
Element pane toolbar
The elements section toolbar is located beneath the element grid:
 Add new element
 : add a new element to the end of the list
.
 Add new sub-element
 : add a new sub-element to the end of the sub-elements list of the currently selected element.
Remove element : delete currently selected element or sub-element (warning will appear prior to delete).
Cut element : delete currently selected element or sub-element and place details on the CostPlanPro clipboard (warning will appear prior to delete).
Insert element : if currently selected an element, insert a new element above the currently selected element; if currently selected a sub-element, insert a new sub-element above the currently selected sub-element.
Copy element : copy currently selected element or sub-element to the CostPlanPro clipboard. This will also copy the all categories and elements to the windows clipboard to enable user to paste to other applications such as excel.
Paste element : paste element on clipboard over the currently selected element. Warning this will replace the currently selected element.
Move element up : move currently selected element or sub-element up by one row. Sub-elements can only move within the element it belongs to.
Move element down : move currently selected element or sub-element down by one row. Sub-elements can only move within the element it belongs to.
Element grid columns
ID2: User editable field. Used to define element id’s.
ID3: User editable field. Used to define sub- elements id’s.
Element: User editable field. Used to define elements’ or sub-elements’ names.
Code: “ Element code”. The element code is an important parameter when completing a cost analysis, as it effectively retrieves the quantities from the model that will be directly used in the cost calculation. Double clicking the element codes displays a dialog with the list of macro instructions that you can select from.
For example code “124. External Wall by CDB item rate & area” instructs the module to process all external wall constructions assigned in the model and retrieve their rate and quantity to calculate the associated construction costs. Each external wall construction in the model will be displayed as a sub-element. Construction name will be the name of the sub-element.
For details on element codes, please refer to section 1.2.4 .
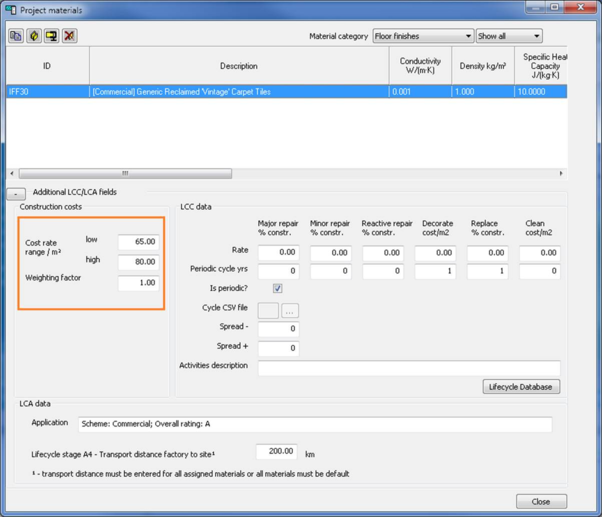
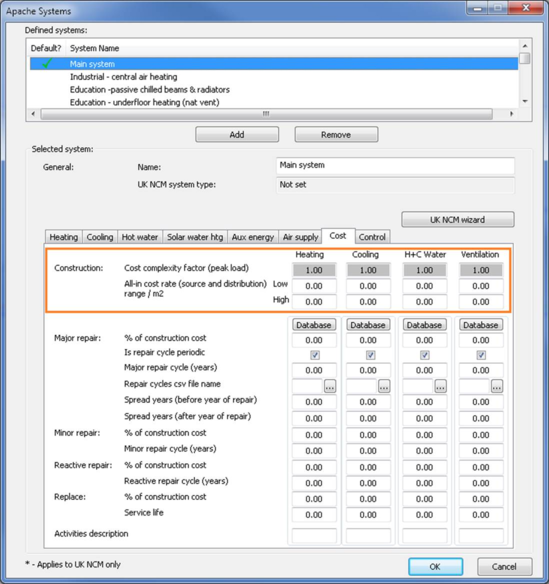
Rate: this field displays the rate used for the cost calculation. Where cost data has been previously assigned to constructions/systems etc. via either the CDB dialog or the Apache systems dialog, the module will refer to an auto sub-element to retrieve the rate cost. An auto-sub element as the name suggests, will retrieve the cost data that has already been assigned to either a system type or construction type. For example the CDB manager dialog shown below. User entered rates will be colored blue. By right clicking the combo box, the user will have the option of using automatic rates, or manually entered rates. This is an editable field. When pricing components or PVs which do not have relevant costing interface, this field is used to fulfill this purpose.
Construction auto sub-elements:
Floor finish or suspended ceilings material auto sub-elements:
System auto sub-elements:
Quantity: this filed displays the quantity used for the cost calculation which is an editable field Depending on the element code selected, quantity will vary accordingly i.e., for construction cost the quantity will be m².
Weight: This is simply a correction factor that will allow the user to locally increase or decrease the element or sub element costs. The weight factor is therefore included in the cost calculation. For non auto-sub elements this variable can be edited by the user, however for auto-sub elemnts the user must recite back to the CDB dialog or systems dialog depending on which variable they want to change.
Base cost: This field is non-editable and displays the total construction cost prior to the application of the location factor, tender price index factor, and the overall project adjustment factor set by the scaling factor on the project settings tab.
Cost: This field is non-editable and displays the total construction cost of an element or sub element.
Cost £ / m2: This field is non-editable and displays the total construction cost of an element or sub element in m²
TPI: Editable. Defines the tender price index the rate is based on. It may come with the cost datasets. If not, any user entered or default TPIs can be overwritten by the default base TPI edit box on the project settings tab. For details on TPI, please refer to section 1.2.3 .
Right click the ID2 or ID3 columns of any row will display the coding schema reference. For example:
This is a NRM based coding schema. Select any item in the above tree then click OK which will allow the id and name of the selected item pop into the id and name column of the currently selected category. The greyed out items are not available for this module. They are used by LCC and LCA modules.
Right click any columns other than ID2, ID2, rate and quantity of any elements or sub-elements will display the context menu. For example:
Context menu:
Operations are similar to the element toolbar described above.
Cut : delete currently selected element or sub-element and place details on clipboard (warning will appear prior to delete)
Copy : copy currently selected element or sub-element to the CostPlanPro clipboard. This will also copy the all categories and elements to the windows clipboard to enable user to paste to other applications such as excel.
Paste : paste the element on the CostPlanPro clipboard over the currently selected element or sub-element.
Paste as new : Add a new element or sub-element to the end of the current list and paste the element on the CostPlanPro clipboard into the new element or sub-element. This option only exists in the context menu.
Add: add a new element or sub-element to the end of the list.
Insert: insert a new element / sub-element above currently selected new element/ sub-element.
Remove : delete currently selected element / sub-element (warning will appear prior to delete).
Move up : move currently selected new element / sub-element up by one row. Sub-elements can only move within the element it belongs to.
Move down : move currently selected new element / sub-element down by one row. Sub-elements can only move within the element it belongs to.
Known issues
|
Number
|
Description
|
Workaround
|
|
1
|
IP units not fully supported.
|
Use metric with initial beta
|
|
2
|
Purge unused constructions in CDB do not take account of non-thermal objects constructions
|
Do not purge constructions.
|
|
3
|
Copy cost plan to external applications such as excel: if a cost plan also contains LCC elements, they will also be copied out.
|
This won’t affect the display of other categories, elements, and the project capital cost. – will be fixed in prior to release
|