In order to set up a model for optimisation, the following steps need to be made:
1. Add assets to be optimised using the 2D virtual network view
2. Set optimisation parameters in the optimisation dialog
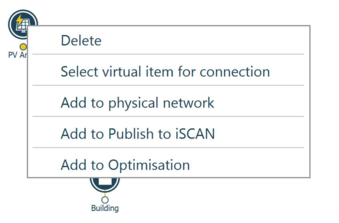
To achieve step 1, right-click on any asset you wish to optimise in the 2D virtual network view and choose “Add to Optimisation”.
This will add the asset to the list of assets that can be configured in the optimisation dialog.
To open the optimisation dialog, select “network” in the object browser and then click the cell “Set optimisation” twice. This cell is to the right of the “Setup” property of the Optimisation category, as shown in the diagram below:
A button will appear allowing the user to open the optimisation dialog.
If the bottom section is empty, make sure to do step 1 above, which will add assets to the optimisation dialog.
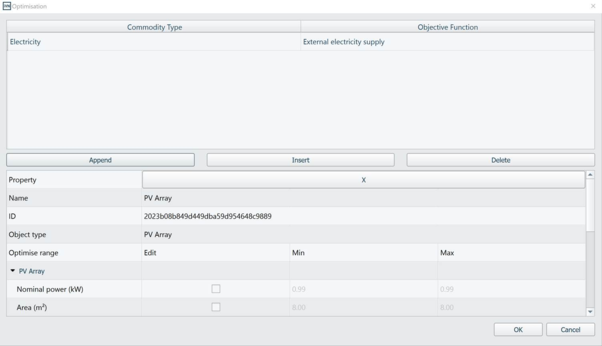
At the top of the panel there is a list of objective functions. Click “Append” or “Insert” to add a new objective function to the list. Click “Delete” to remove an objective function. The objective functions are used to determine the overall aim of the optimisation algorithm. For example, if “External electricity supply” is chosen as an objective function, the optimisation algorithm will try to optimise the parameters in such a way as to minimise the external electricity demand. “External heat supply” and “External cooling supply” are the other two commodities that can be added as objective functions.
At the bottom of the panel there is a list of assets that have been added to the optimisation dialog. To remove an asset from the optimisation, click the “X” button at the top of its column. For each asset, select which parameters are going to be optimised and, consequently, become decision variables for the optimisation algorithm by clicking the check boxes under the “Edit” column. For each parameter the minimum and maximum values that the optimisation algorithm will consider can be set.
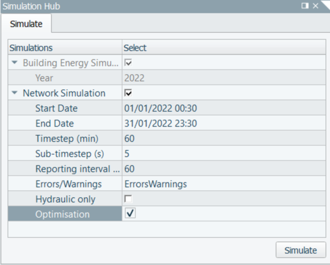
When happy with the optimisation problem, close the window and to run the algorithm, tick the “Optimisation” box in the Simulation Hub before clicking “Simulate”.